December 25, 2007

X'mas Cookie Baking II

As mentioned, this is the one of the other x'mas cookie that I had made. It's called the chocolate chunk cookie, recipe courtesy by Cheryl - She Bakes and She Cooks. Instead of adding chocolate chips, this cookie added lots of chocolate chunks; resulting in a rich, buttery vanilla cookie infused with lots of chocolate flavour. You can bite chunks of chocolate in every bite! Big or small chunks, depends on how you want it to be. It is really very nice, I promise! When I read her blog raving about how good this is, I decided I had better try on my own. It really didnt disappoint me. This is the second time I made this and the results were equally good on both attempts. The recipe yield large amount if you were to make a normal size cookie. But not to worry or even thinking of halving the recipe because they'll be gone very soon! Hehe...do give it a try, the steps are simple enough!
Ingredients:

3/4 cup (about 185 g) unsalted butter, softened
1 cup brown sugar (I used 3/4 cup)
1/4 cup granulated sugar
1 egg
2 tsp vanilla extract
2 cups all purpose flour
2 tsp cornstarch (I omitted this - see below tips)
1 tsp baking soda (I changed to baking powder - see tips)
1/2 tsp salt
8 oz bittersweet chocolate, cut into chunks

Method:

  1. Preheat oven to 350 F / 180 °C.
  2. Cream together butter and sugars until smooth.
  3. Add egg and vanilla and blend in. Mix the rest of the dry ingredients and add in chocolate chunks.
  4. Use a tablespoon (I used teaspoon as I don't like my cookie too big) to drop cookie dough on to a greased baking sheet.
  5. Bake for approx. 8 to 10 minutes or until golden brown around the edges.
  6. Cool on a wire rack.

Yield about 70 to 80 small size cookies (about 3 cm in diameter)

Tips: This cookie is supposed to be chewy. But I prefer crispy cookie. Omit the cornstarch and replace the baking soda with baking powder if you want to make crispy versions.

Bake longer if you like crispier cookie, until the sides are brown, but watch out for overbaking. They turn soft really fast. So, once cooled, store in an airtight container. If it turns soft, bake it in the oven for about 1 to 2 min, let it cool again, then store. :)

------------------------------------------------------------------------------------------------

Okay, coming to my last cookie of 2007

Peanut Butter Cookies!

Well, I could actually have double up the recipe for the chocolate chunk cookies to give to the little kids at my aunt's christmas day dinner. But I wanted try different variations. I had always wanted to bake peanut butter cookies but I'm sure many of you would have agreed with me that there are always so many in our to-try-list that the list is never-ending. I would usually look at the ingredients I have on hand, the occasion for me to bake certain things or simply the crave for something. Heheh so, this is my chance to bake this cookie, otherwise I don't know how long I have to put off until.

Hehe...I'm being long-winded again. lol. Alright, this cookie was introduced through Cheryl - She bake & She Cooks blog, the original recipe from Nic - BakingBites.

These cookies were crispy and had just the right sweetness and saltiness. As usual I used teaspoon to spoon them onto the trays, though I felt that they should be made bigger in order to get the 'kick' out of peanut butter favour, especially if you are peanut lover. ;)

Ingredients:

1 1/4 cup all purpose flour
1/2 tsp baking soda
1/2 tsp salt
1/2 cup butter, softened
1/2 cup brown sugar
1/2 cup white sugar
1 egg
1 tsp vanilla extract
1/2 cup peanut butter (smooth or crunchy)

Method:

  1. Preheat oven to 350F / 180°C.
  2. Sift together flour, baking soda and salt.
  3. Cream together butter and sugars. Beat in egg, followed by vanilla and peanut butter and beat well.
  4. Add in dry ingredients and beat on low speed until combined.
  5. Drop spoonfuls onto lined baking sheet.
  6. Using a fork, mark grid patterns on top of each cookie, dipping the fork in water after each cookie. (Some recipe requires the chilling of dough, so I guess the dipping of fork in water is not neccessary; but for this method, this step is crucial else you would not be able to get the grids properly)
  7. Bake for 11 to 12 minutes, until the edges just begin to turn brown.
  8. Cool on wire rack.
  9. Once cool, store in an airtight container immediately.

Recipe Source: Bakingbites

December 24, 2007

X'mas Cookie Baking I

The past few days had been a cookie baking marathorn for me. I had been baking x'mas cookies for different groups of friends, one day after another. I had wanted to bake some cupcakes with frosting and probably a yule log (although I don't have much confidence) but after I had finished with my last batch of cookies on saturday night, I told myself it's really time to take a rest! I wanted some time to myself to amend the dress I bought and doll myself up for my gatherings. Hehe...:P

Next year, hopefully I will have pre-empt more time to bake a log cake. Meantime, I would have to continue practising the technique of making a swiss roll. :)

I made a total of 4 different types of cookies this year, although nothing much elaborate. They were mostly simple cookies to suit the taste and preferences of the recepients.

This is the first christmas cookie I made. I used a simple sugar cookie recipe adopted from Joy of Baking. This type of cookie is harder and crispier as compared to the previous one I made, which yielded those danish cookies with a melt-in-your-mouth texture. I find that this recipe was ok, I couldn't comment much as I seldom make such cookies; it was crispy but it had to be stored in an air-tight container if not it turns soft easily.

I did not made any sugar frosting as I'll only be making small batches so decided to try with melted chocolate. But the melted chocolate was too soft and not good at piping and drawing at all! I was also not experienced. Hehe, so it looked kinda ugly, especially the gingerbread man. For the pink frosting, I added some strawberry emulco to the melted white chocolate and the result was not bad, it was firmer and has a tinge of strawberry taste, much to the likings from my friends!

Ingredients:

  • 245 g all purpose flour
  • 1/8 tsp salt
  • 1/2 tsp baking powder
  • 113 g unsalted butter, room temperature
  • 150 g granulated white sugar (I used 120 g)
  • 1 large egg
  • 1 tsp vanilla essence

Method:

  1. In a separate bowl, whisk together the flour, salt, and baking powder. Set aside.
  2. Beat butter and sugar until light and fluffy. Add the eggs and vanilla and beat until combined. Add the flour mixture and beat until a smooth dough is formed.
  3. Divide the dough in half and wrap each half in plastic wrap. Refrigerate for about one hour or until firm enough to roll.
  4. Preheat oven to 175°C and place rack in center of oven.
  5. Remove one half of the chilled dough from the refrigerator and, on a lightly floured surface, roll out the dough to a thickness of 1/4 inch (1 cm).
  6. Cut out desired shapes using a lightly floured cookie cutter and transfer cookies to the prepared baking sheet.
  7. Place the baking sheets with the unbaked cookies in the refrigerator for 10 to 15 minutes to chill the dough which prevents the cookies from spreading and losing their shape while baking.
  8. Bake cookies for about 10 minutes (depending on size) or until they are brown around the edges. Remove from oven and let cookies cool on baking sheet for a few minutes before transferring to a wire rack to finish cooling.
  9. Frost as desired.

Note: I made half recipe. For frosting recipe, refer to recipe source: Joy of Baking


Due to the melted chocolate piping which wasn't as firm as sugar / royal icing, it smulged onto the cookie bag when I packed for my friend. Aiya, so bad presentation...Hope she don't mind. :P
----------------------------------------------------------------------------------------------------------------
The second cookie that I made was for a group of my beloved girl friends. I knew they like shortbread-like texture. So I hopped through several blogs and websites for ideas and finally decided to settle on this snowball cookies by
Cheryl - She Bakes and She Cooks. This gal whom I realized is my junior from NUS though different faculty, writes really well; she has an interesting blog on food, do check out her blog for dining-out ideas as well as foolproof recipes.
This melting-moments cookie that I made is essentially a Russian Tea cake (or Mexican Wedding cake as some called it) but with a hidden surprise inside...hershey kisses! I had fun making these cookie; as it was Dong Zhi (Winter Solstice Festival) the next day, I felt as if I'm reviving my good old childhood days of making Tang Yuan (glutinous rice dumplings), only that instead of using glutinoud rice flour, now I'm using rich buttery dough wrapped with hershey kisses chocolates!

My mum used to buy those pre-made glutinous rice flour which has already been rolled into a dough. They usually comes in pink and white colour. We would wrap each dumpling in gula medeka and cooked in a sweetened soup. For past couple of years, my mum just bought pre-packaged tang yuan instead of making our ownself. I added one whole hershey kiss into one cookie...yes it's sinful but really heavenly! Her recipe also called for a generous amount of chopped nuts. There is no better combination than chocolates and shortbread cookie especially if you are a lover of these two! My friends liked them a lot. This recipe is definitely a keeper!
Ingredients:

  • 227 g soft butter
  • 1 tsp vanilla essence
  • 1/2 cup sugar
  • 2 cups sifted flour
  • 1 cup finely chopped nuts (I used almond nibs and had it toasted)
  • 1 package of chocolate kisses (there are 24 inside)
  • Powdered Sugar

Method:

  1. Beat butter, sugar and vanilla until light and fluffy.
  2. Add sifted flour and nuts, blend well.
  3. Chill dough about 1/2 hour. Remove foil from kisses and shape dough around kisses, using scant tablespoon of dough for each.
  4. Roll to form a ball. (Each ball would have a diameter of about 3 cm)
  5. Bake on ungreased cookie sheet at 190°C for 12 minutes until set but not brown.
  6. While still warm roll in powdered sugar.
  7. Cool and store in a tightly covered container. Roll in sugar again before serving if desired.

Merry Christmas to all!

December 20, 2007

Banana Yogurt Muffins

Ok...this is going to be a quick, short and sweet post.
I am always delighted when I have over-ripe bananas at home, which means it's the chance for me not to waste and to make something meaningful out of it. lol. I had not been making banana cake for quite some time, so decided to try this banana yogurt cake from Florence - Do what I like. I was pretty confident of this recipe; so far I have never had any problem with any recipes from her. :)

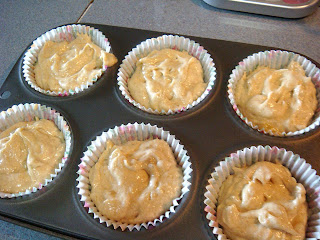
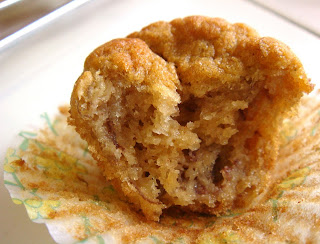
After measuring the butter and sugar, followed by the mashed bananas, I realised I did not have the 320 g mashed banana stated in the recipe. I only had 193 g. So, I did some calculations and scaled down all the other ingredients according to the ratio, all except the butter and sugar which I had already measured. I was thinking probably it would not make alot of difference since more butter would give a more buttery taste. I was wrong! The resulting muffins was way too moist, that it sank and became crumbled after taking out of the oven.

Fortunately, it still tasted good, soft, fluffy, just too moist. I'll still be posting the original recipe as I believed if I had followed the recipe correctly, it'll definitely rules!


Ingredients:

100 g butter
90 g sugar
2 eggs, lightly beaten + 1 tsp vanilla essence
320 g mashed banana + 1 tbsp lemon juice (I omitted this and still ok)
125 ml plain yogurt
130 g plain flour
60 g cake flour
1 tsp baking soda
1 1/4 tsp ground cinnamon

Method:

Cream butter and sugar until light and fluffy
Beaten in the egg mixture one third at a time until well blended
Beat in the mashed bananas and yogurt until well blended
Fold in sifted flours, baking soda and cinnamon
Spoon batter into lined muffin trays.
Baked at 175°C for 20-25 minutes until a skewer inserted comes out clean.

Yield 6 regular muffins and 12 mini muffins

Recipe Source: Florence - Do what I Like

Moral of the story? Know the science of baking first, then the artistic element can come in. Proportion of ingredients is still the most important, do not ever try to play with the proportion or tweak too much, else the baked good would just flop. ;)

December 19, 2007

Min Jiang Kueh


This is one of my favourite kueh. Be it crispy, thin, thick, traditional...I love them all; so long as my favourite peanut fillings is there. ;) I think each type has its own unique taste and texture; preference goes to the individual. I do not know exactly where it originated from though it seemed to originate from Malaysia and Singapore, made by the Hokkeins. I remembered eating these since young. Traditional ones which I've eaten since young usually comes with loose peanut fillings, and were smaller and thinner; while the upmarket ones we see now are usually peanut fillings that have been grounded into a creamy paste, taste sweeter, thicker and made using a large flat iron skillet and sliced into portions.

For me, I like both as long as the peanut fillings is generous..*yum yum*, although I do look at the texture of the pancakes.

I had wanted to try this recipe but had been putting it off as the process, though not difficult, seemed rather long, looking at the lengthly post written by Seadragon - Cafe of the East. I finally get down to making it as the grated peanuts I bought will be expiring in a few days time! I also had a packet of red bean paste from Daiso and would be a good time to try it. ;)

Ingredients for pancake:

150 g plain flour
1 tsp instant dry yeast
35 g caster sugar (I used 30 g)
1/4 tsp salt
200 ml tepid water (water that is lukewarm to touch)
2 eggs at rom temperature, lightly beaten
60 ml canola oil (I used 50 ml)
1/2 tsp alkaline water (If you have no alkaline water, one of the tips Seadragon shared is to replace with 1/2 tsp baking soda dissolved in 1/2 tsp water - it seemed ok as I did not know what would be the difference if i had used alkine water)
extra tepid water if neccessary

Ingredients for sesame peanut mix:

100 g peanuts
25 g white sesame seeds
50 g caster sugar, or to taste

Method:

  1. Mix together flour, yeast, sugar and salt in a mixing bowl.
  2. Add in 200 ml tepid water and stir to mix well. Put in a warm place, cover loosely with cling wrap, and let proof until bubbly and double in size.

This is how it looks when double in size

  1. Once the batter double in size, add lightly beaten eggs, oil and alkaline water.
  2. Beat to mix in well. Let stand 5 to 10 minutes before cooking. (The batter at this stage should be of pouring consistency. You can check when cooking the first pancake; the batter should immediately flow into a circle as soon as you pour into the pan. If it is too viscous and takes a little while to flow into a circle, mix another tbsp or so of tepid water into the batter.
  3. Heat a non-stick crepe pan (top about 20 cm diameter) until hot. Pour a little canola oil, then wipe over the surface with a paper towel.
  4. Pour about 125 ml (or more to make it thicker).
  5. Cover the pan with a lid and cook over medium to low heat for about 3 to 4 minutes, or until the top is bubbly and just set.
  6. Spoon sesame peanut mix onto half of the pancake, lift the other side and fold over.
  7. Best serve hot or warm.
Method for sesame peanut mix:

  1. Dry roast peanuts (in skin) over moderate heat in a frying pan for about 5 to 8 minutes, until fragant or lightly brown. Cool, skin the peanuts.
  2. Dry roast sesame seeds in the same way for about 3 to 5 minutes.
  3. Blend or ground peanuts and sesame seeds into powder, mix in sugar and store in an airtight container until ready to use.
Note: I used grounded peanuts which is so much more convenient. If you want the creamy peanut paste, blend in with the sugar.

Do refer to the recipe source: Cafe of the East for more tips.

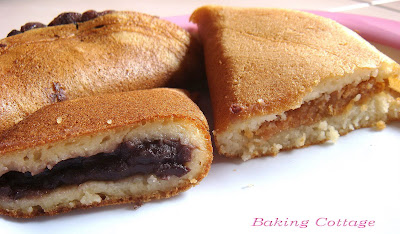
Overall, I find this recipe is worth trying. It may seemed tedious but it's actually not. The only waiting time is the proofing. Mine did not appeared to have a good honeycomb structure; probably cos' I did not pour enough batter to make it thick enough. I filled half with peanut mix and the other half with red bean paste. I liked this red bean paste from Daiso, as it has chunks of red bean in it, whic is often found only in Japanese desserts. Yummy!

If you like this type of pancakes and have the ingredients, try it for yourself at home! ;)

December 5, 2007

Cookie monster is creeping in...

I made these cookies quite some time ago, but had delayed posting it as I only made half the batch while I freezed the other half of the dough to try out some others on another day. These cookies yield soft, buttery cookies that melt in your mouth. They tasted almost like shortbread though it is not that powdery and crumbly.


The original recipe was supposed to be vanilla wafers where the dough is to be formed into logs and chilled until firm, about 2 hours, then cut into slices (about 6mm thick). I find that rather boring, so I decided to make several variations using the same recipe, as I had wanted to take this as a trial and error session. During my first trial, I piped the dough into different shapes and patterns. Was quite pleased with the result, both in terms of texture and taste. My friend, whose mum is a good baker, even requested for the recipe so that she can bake and sell during chinese new year!


I took the recipe from Williams-Sonoma -- Essentials of Baking. You would have find me using her recipes quite frequently as this is by far the only baking book I own, not to mention some other chinese recipe books, so wanna try more of the recipes here.


Ingredients:

  • 1 cup (8 oz/250 g) unsalted butter
  • 1/2 cup (4 oz/125 g) sugar
  • 1/4 tsp salt
  • 2 large egg yolks
  • 1 tbsp vanilla extract
  • 2 cups (10 oz/315 g) all purpose flour

Method:

  1. In a large bowl, cream butter, sugar and salt until smooth.
  2. Add in the egg yolks and vanilla and beat on low speed until blended.
  3. Add in the flour and mix until incorporated and a smooth dough forms.
  4. Divide dough into 4 equal portions. Roll each into a log 7 inches (18 cm) long and 1 1/2 inches (4 cm) in diameter.
  5. Wrap in plastic wrap and refrigerate until firm, about 2 hours.
  6. Position a rack in the middle of the oven, preheat oven to 180°C.
  7. Cut each log into slices, about 6 mm thick.
  8. Bake for 12-15 minutes, until the edges and bottoms are golden.
  9. Cool cookies on the baking sheet for 5 minutes, then transfer them to wire racks to cool completely.

Recipe Source: Williams-Sonoma

Note: For me, I simply transfer the dough (no need to refrigerate) into a pastry bag and piped into shapes as desired. :)

With the leftover egg whites, I baked some almond crisps; recipe from e's joies. I was surprised that only 2 small egg whites can yield so many crisps, cause' each crisp is so thin. To make these crisp, you got to really spread it until it's very thin. The thinner it is, the more cookies you will get, and the crispier it is! I made some modification to the recipe by doubling the recipe and adding green tea powder. I've came across other recipes that uses butter but I followed Elyn's recipe without the use of butter. The result turned out to be good as well; and I easily gobbled up almost half the batch while I was tranferring it for cooling and storing. :PIngredients :

  • 2 egg whites
  • 50g fine sugar
  • 1/4 tsp vanilla essence
  • 1 tsp green tea powder
  • 40g self-raising flour
  • Almond flakes for decoration

Method :

  1. Mix egg white, sugar, green tea powder and vanilla essence till sugar is dissolved.
  2. Add sifted self-raising flour and mix well.
  3. Use the back of a metal spoon to apply a really thin layer on baking paper.
  4. Sprinkle a few almond flakes on top.
  5. Bake at 170 degrees for 10 mins or till lightly brown.
  6. Once it’s cooled, keep in air-tight container.

Recipe Source: e's joie

This are half of the other batch which I had saved to be baked on another day. These cookies are rather big so there wasn't enough dough for me to actually bake huge batches. So I only experimented the heart and gingerbread man cookie cutter, and tried some sugar frosting.

I especially like this strawberry sandwich hearts. They are so beautiful, and the combination of jam with buttery cookie tasted very good. You may use other jams such as blackcurrant or raspberry as well. One thing to note is that the dough must be chilled till firm before cutting, otherwise it would be quite difficult to get nicely cut-out heart. I might be considering this for my christmas giveaway, though the original recipe is slightly different. For the centre cut-outs, I sandwiched with nutella!

This is the first time I experimented with sugar icing. However I did not follow an exact recipe as I wanted to make only tiny amounts. I mixed some milk with icing sugar, added some colouring until I get the consistency I wanted. However, I made too little that it was not enough to go into a piping bag! So I merely decorated its hand and feet, abit ugly though. Hehe. :P

December 2, 2007

Honey Cake

I bought a bottle of mirin recently, after reading some Japanese cook books about this condiment and came across some recipes using mirin.

For your information, mirin is a type of condiment used in Japanese cooking. It is a heavily sweetened sake made from shochu (distilled sake). Mirin-fuhmi is a mirin flavouring that is synthetically made and contains only 1 percent alcohol. Hon-mirin, on the other hand is real mirin containing 14 percent alcohol. In case you have not seen mirin before, this is how it looks like.

I came across this honey cake recipe using honey and mirin. The way it was described was so tempting that I have to try. The process was almost the same as making a chiffon cake, except for the sequence in the mixing of the ingredients. As mine did not turn out successfully, I still do not know whether if that mixing method should be the correct one. Anyway, I will type out the original recipe for you to try out cos' the taste is good. It's sweet yet not those kind of sweetness you get from white sugar. There's hint of honey flavour, which makes it smell and taste different. Pardon me cos' I'm not good with my vocab ..don't really know how to describe it LoL...I do not know if mirin plays a part in bringing out the flavour. But it was written on the blog that it taste as good without the mirin, except for a little bit of 'special' taste. ;) Recipe from this chinese blog - Pink Fantasy.


Ingredient:

  • 3 eggs
  • 5 tbsp sugar
  • 1 tbsp honey
  • 1 tbsp mirin
  • 1 tbsp canola oil
  • 1/8 tsp cream of tartar/vinegar
  • 1/2 cup cake flour, sifted


Method:

  1. Preheat oven to 175°C. Separate the egg yolks and egg whites
  2. Beat egg yolks with 1 tbsp sugar; add in honey, mirin, oil and finally 1/4 cup (half of the flour) flour, a little at a time, beating well after each addition.
  3. Add cream of tartar/vinegar to the egg whites and beat with an electric beater, add in the remaining 4 tbsp sugar in 3 separate additions, continue beating until stiff peaks.
  4. Fold 1/3 of the beaten egg whites into the flour and egg yolk mixture; followed by the remaining 1/4 cup flour; and finally fold in the remaining egg whites. Mix gently.
  5. Pour the batter into a 9 by 4-inch loaf pan and bake in the oven for 35 minutes.

Note: To prevent the top of the cake from over browning due to the honey, can put a piece of aluminium foil halfway during the baking. But be fast.

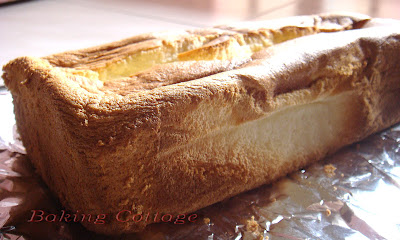
The cake rose beautifully while baking in the oven, with a large crack in the centre though. Itchy hand me went to overturn it during the cooling process. The recipe actually didn't say so. I think it was a wrong move, Cos' the cake shrink badly..:( as seen from the photo. I'm not sure whether it was due to the egg white deflating, or cos' I should not have overturn it, especially with parchment paper lined. I do had this experience before, where I lined a round cake pan to bake chiffon cake and after overturned it, the paper pressed against the cake, deflating the own cake.

I was rather apprehensive about the mixing method, that is to mix in half of the flour first with egg yolk, then mixing the remaining half flour with the egg white. But I think that should not be a problem, as Pink fantasy who made this had no problem. :) Hope you have success with this should you try it cos' it really taste good. :)