December 28, 2008

A late Christmas wish & Happy 2009

Christmas is over and in a few days time, we are crossing over to the new year again! How time flies... we may not know it as we live our hectic life day by day; but with this blog, I can truly sense it because everytime when I make a posting towards the end of the month, I knew oh it's another month again. :)

Sorry that I had not been able to make a decent post to give my christmas wishes to all readers before the christmas. I had been so busy with friends' gatherings, outings, etc that I finally have the time to make a post today, after having uploaded all the photos taken during this festive period.
This christmas, I didn't really bake anything special, but I was happy that I got to be involved in baking cookies for my unit's X'mas Party. The cookies were to be given to each of us as door-gifts. My colleague and I came out with the idea of making giant chewy cookies and tied it like a lollipop!
This is an oatmeal raisin cookie and I decorated it with m&ms and melted chocolate. I should have used dark chocolate instead of milk chocolate because it took the whole day to be dried up and the brown colour wasn't distinctive enough.
I also baked a christmas fruitcake for my family and dd and some in mini cupcakes for my colleagues. This fruitcake recipe is a much lighter version and I really like the taste of it. The only modification was I used grand marnier instead of brandy and I replaced cinnamon powder with mixed spice. Recipe taken from Florence's blog.

I would like to end this post by wishing all my dear friends, readers and baking kakis a very happy new year! May everyone have a fruitful year ahead in 2009! :D

December 12, 2008

In the Mood for X'mas Baking!


I'm sure many of you out there are now busy planning or involved in X'mas baking, cooking... be it for sale, gifts or just to get into the mood of it. :)

I have no idea why, this year's christmas season seems to be coming in such a rush that I don't seem to have done much x'mas baking. I've been putting off things that I wanted to bake as I'm more involved in christmas shopping this year. I've also been trying out some giant, chewy cookie recipes which I will be making as doorgifts during my unit's (company) x'mas party. Meaningful and fun yea! Heh heh... ;) Well, I still feel that baking x'mas-shaped cookies (like those frosted cut-out sugar cookies which I baked last year) would make me feel more involved in x'mas baking... Hehe....

Anyway, I did bake something christmas-y, and that was almost two weeks ago! it's something I've never tried before... Christmas bread aka The Pandoro! Haha, actually I don't know whether it should be "A Pandoro" or "The Pandoro", LOL, cos' I'm not familiar with this kind of bread at all. Stollen, Panettone..yes but not Pandoro. This recipe was beautifully printed in “孟老师的一百道面包”. A little about Pandoro here taken from the book - A Pandoro originated from North Italy, Verona. Unlike most bread, this bread contain more butter and sugar and when baked, the result is a beautifully golden crusted bread, hence also commonly known as "Golden Bread". It is traditionally baked in a star-shape mould so that when you overturn it after baking, it resembles the shape of a christmas tree. I don't have those kind of mould, hence I baked it in my 6-inch chiffon tube pan. I think it looks more like an eskimo's igloo. LOL.


Because of the large amount of fats used, the bread is golden brown (even without any colouring), with very crisp golden crust. It's very very soft and fluffy when fresh out of the oven but a little oily as well. It's very delicious eaten on its own! However, this bread doesn't keep well. After a day, it turned hard. But if you are one who likes toast, the bread tasted great when toasted because of the fine golden crust and buttery flavour. I whopped down two big pieces for my breakfast after toasted it. :P

If you can spare a bit of time, I recommend baking this bread for breakfast on a festive morning. :)
p/s: I realised I had spelt wrongly as 'Pandora' on the photo. Sorry! :P
Pandoro
Ingredient A:
100g bread flour
2g instant yeast
75g fresh milk
Ingredient B:
200g bread flour
60g castor sugar
1/4 tsp salt
2g instant yeast
35g egg yolk
50g whole egg
35g fresh milk
Ingredient C:
100g unsalted butter
1/4 tsp lemon rind (I omitted this)
Method:
  1. Mix ingredients A together using slow speed until well mixed to form a dough. Cover in cling wrap and refrigerate for 10 hours.
  2. Mix together the dough from step (1) with ingredients B. Beat until well mixed to form a dough.
  3. Cut butter (ingredients C) into small cubes and add into the dough. Continue beating until a smooth dough is formed.
  4. Gather the dough and form it into round shape. Put into a large mixing bowl, cover with cling wrap and let it proof for about 50 minutes.
  5. Release the air, divide the dough into two portions, shape into two round balls and placed it in the mould.
  6. Let it undergo final proofing for 60 minutes, or when dough reaches 90% full.
  7. If you are using the star-shape mould, use a metal plate to cover the opening of the mould. This is to prevent the top portion of the bread from expanding. The top needs to be flat in order to be inverted and stand like an X'mas tree.
  8. Bake at 170°C for about 35 minutes.
Recipe Source:孟老师的一百道面包
Note: I did all the kneading with my bread machine. Because of the amount of butter used, I let the machine knead for 40 minutes before a smooth, non sticky dough was done.

Happy X'mas Baking Everyone!

December 6, 2008

Multi-grain Rolls

Multi-grain rolls...this reminds of the ones I had at "The Soup Spoon", where a small dinner roll is usually accompanied with a bowl of soup. I like their rolls cos' it's so soft and fluffy, best to be eaten with a bowl of thick, hot soup.

If not for the time consumed, I always love making breads because there would usually be no wastage and again, it's just so satiosfying to have home-made bread and eat it whatever you want, on it's own, as sandwiches...etc.

A few months back, I bought a packet of multi-grain toppings but fail to realise that the 'best by' date is already overdue by a week! It's such a big packet and I really hate to see my pantry ingredients going to a waste. I did some googling and gathered that 'best by' date means that the product would be at its freshest by that date. It can usually be consumed within a few weeks or a month as long as it's not spoilt (use your senses to gauge!).

Heh heh... as the toppings still smell and looked fresh to me, I decided to finish it up and make some multi-grain rolls. Although the recipe doesn't require so much toppings, I just sprinkled the remaining generously over the final proofed bread.

The above was the texture I took after a day. I didn't get to try the texture the day it was baked cos' I rushed out of my house immediately after baking! I wouldn't say it's as soft as it should be, but they weren't too bad, not the kind of rough, coarse texture at least.

By the way, the original recipe was a pumpkin seed bread, but I replaced the pumpkin seeds with multi-grain toppings instead! :D The recipe is taken from “孟老师的一百道面包” . I shall not be posting the recipe since I did too many modifications and dare not say it was real soft. :P If you are interested, do drop me a comment. ;)


Egg Mayo Sandwich! Yummy!

November 30, 2008

Red Bean Buns


I have not been making sweet buns for quite some time and was happy that I made it last week! This red bean bun (Anpan) may not be unfamiliar to some of you because Small Small Baker, MH from My Home Kitchen and Happy Mrs Kwok had attempted it before. Recipe comes from the same book “孟老师的一百道面包”. Most of the recipes in the book are easy to follow and yield just suitable proportion for Home Bakers. :)

I didn't know that to achieve this shape is so simple just by making eight slits around a normal round shape bun!

For this recipe, the final proofing after making the slits is only 10 minutes. I was actually wondering if the bread could be fluffier if I had proofed it longer? If I make this again, I'll try proofing it for a longer time during the final proofing to see if the result differs. :)

Recipe can be found at My Home Kitchen and Happy Mrs Kwok.


November 24, 2008

Honey Muffins


Yet another basic muffin recipe again. A plain muffin, nothing spectular, but I was really elated when I saw it puffing so high in the oven as the usual smell of baked muffins filled the entire kitchen on a weekday night. If I happened to miss my baking sessions that weekend, I'll satisfy that urge and bake something during a weekday night, more of enjoying the process rather than eating the muffin. :P
This was in fact my very first muffin, yeah and a very successful muffin despite I'm using the old, small oven back then. This recipe was shared by a university friend of mine, who told me that baking was not difficult as she graciously passed this recipe to me, telling me that it's a simple and good recipe and I'll definitely gain more confidence after I succeeded. True enough, the muffin turned out so well that it ignited my passion for baking and probably that's how I continue thereafter... baking whenever I have the time to spare, and even more crazy now that I no longer have to face exams, tutorials, tests, etc and can better plan my time.
Once in a while, I still come back to this recipe whenever I have the ingredients but somehow it doesn't turned out as good as it was and this had been puzzling me until this time round, I think I finally got the answer. As this recipe called for self-raising flour, which I don't often stock up, I tend to replace it with plain flour + baking powder (as a substitution). Although the result was okay, I mean still edible of course but somwhow it was dense and just not right. It did crossed my mind that the flour could be the culprit. So I need to try it out to confirm. I guess I'm right, cos' this time round, I faithfully followed the recipe using self-raising flour and yeah! I got it! The muffin was soft and fluffy, and the sweetness that comes from honey always makes me love it more. My dd's mum commented it's a little dry, though I felt it was okay. Hmmm, well probably adding a little more butter helps?
I baked in mini muffin pans and yielded 16 minis using only half recipe. I deliberately filled the muffin cups with batter right up to the top to achiev a very big dome like a mushroom! I think it looks pretty don't you think so?? :P
Honey Muffins (This is the original recipe, should yield 12 standard size or 32 minis with big mushrom head!)
Ingredients:
300g self-raising flour
150g castor sugar (I reduced to 120g)
15g milk powder
120g butter
30g honey
90g eggs
165g water
3g Vanilla essence
90g Blueberry (optional)
Method:
  1. Preheat oven to 180°C.
  2. Cream butter, sugar, milk powder and honey until light.
  3. Add eggs in stages.
  4. Sift in the Self-raising flour and add alternately with the water to the batter.
  5. Blend in the blueberries and vanilla essence.
  6. Bake for 20-25 minutes (I used 15 minutes for mini muffins) or until done.

November 20, 2008

Two "Yammy" dishes

Have I ever mentioned before, that I love eating yam. I love the taste, and the texture that's similar to sweet potatoes, potatoes, chestnuts, etc.

Yam desserts such as Orh Nee (a chinese dessert where yam is mashed and cooked into puree, usually with pumpkin and ginko nuts) or yam fritters are usually too sweet for my liking even though I like it. I love yam rice or some very good yam cakes where I can bite into chunky bits of yam. However my mum never cook yam at all cos' she says it is not easy to clean and peel it.

Recently I bought this food magazine 'Food & Travel . Kitchen Culture' from the supermart. This magazine has quite an extensive number of articles on cooking tips, recipes, food reviews and travel articles of personal accounts from travel writers revolving around food and culture. It's quite interesting. I just bought another issue of it yesterday and shall see if this is worth my monthly read. ;) Heh ok what I wanna mention about is this fried yam rice in the magazine.

I bought a packet of pre-packed yam which had been peeled and washed. Great! Heh, good for lazy people like me. I did'nt know things are so convenient now. :D On that very day itself, I made this steam yam cake, for my mum to bring to her karaoke sessions with my aunties (hoping it'll be successful) and my myself and dd to try. I followed Happy Mrs Kwok's recipe. However, for the seasonings, she only mentioned "as desired" and I'm poor at gauging how much I should use as I don't cook often. So the yam cake turned out too bland! Heh... luckily with some sesame oil, sesame seeds and soya sauce, it was still edible. Haha! My mum said my aunties were hungry so it was still well received. LOL!

Do note that you've really got to wait till it's completely cooled before slicing as it was very soft and mashy immediately after steamed. I did not pan fry it, too much of a hassle for me, but I believe it would taste much better.
I saved some of the yam for my bento fried rice the next day. As long as you prepare the ingredients in advance, cooking time took less than 20 minutes. The yam rice was very fragrant and I really like the chunky yam. :P

Fried Yam Rice (Serves 2)

Ingredients:

1 tbsp finely chopped garlic
1 tbsp finely chopped onion
1 cup cooked rice
1 tbsp oil
1 1/2 cup chicken stock
1/2 cup cooked yam, cut into large chunks
1 tbsp sesame oil
1 tbsp oyster sauce
35g toasted dried shrimp
55g sliced Chinese sausage
20g dried scallop, pre-soaked in water to soften


For garnishing:

10g coriander leaves
10g toasted sesame seeds
10g sliced red chilli

Method:
  1. Heat oil in a wok, then stir-fry the onion and garlic till fragrant.
  2. Add in the rest of the ingredients one by one, except the rice.
  3. Toss the mixture while stir-frying for 2 to 3 minutes.
  4. Add the rice to the mixture and mix well.
  5. Garnish the fried yam rice and serve immediately.

Recipe Source: Food & Travel - Oct 2008 Issue (Pg 43)

Note: Do add the chicken stock a little at a time. I do not know how much their 1 cup of rice constitutes. 1 1/2 cup stock intially seemed too much for my 1 cup of rice so I only added about 1/2 cup. However, as I was stir-frying the rice, I found that the stock actually absorbed well into the rice (probably because of the yam), hence I added more sesame oil to make it less dry. I also omitted onion, dried scallop, and coriander leaves.


Worth giving this simple one-bowl dish a try!

November 15, 2008

Indonesian Walnut Butter Cake

Despite having taken many shots of this moist walnut butter cake, I just couldn't seem to be able to capture its moist soft texture. Blame it on my poor photography skills, and lack of lighting in my house, heh, so I only have this one best shot here to present.

I made this butter cake at my Company's 'Charity Breakfast Sale'. My mum was lamenting that all that I baked went to the sale and there were only a few pieces and scrapes left for her. So, I baked this again for her and my dd. Using a 7-inch square pan, I was able to cut into three logs, one for dd and 2 for ourselves. Surprisingly out of the many cakes I baked, this butter cake was wiped out in 2 or 3 days! It is no wonder that you can just simply guage how good a food is by how fast it's wiped finish (or not at all). :P


Ingredients:

250g Butter
200g sugar (I reduced to 150g)
4 eggs, separated
200g Plain/cake flour
4g baking powder
30g chocolate chips
150g walnuts
vanilla essence (optional)


Method:
  1. Prepare and line a 9-inch cake pan (I used 7-inch square pan).
  2. Chop walnuts and lightly toast in an oven for about 5 minutes. Be careful not to over toast it.
  3. Sift flour and baking powder. Set aside.

  4. In a large mixing bowl, cream slightly softened butter with half of the sugar (in my case 75g) using an electric beater until light and fluffy.
  5. Add egg yolks, one by one and cream and cream till well mixed.

  6. Add in flour mixture slowly (You may use a wooden spoon manually or if you are using an electric beater, to use low speed). Set aside.
  7. In another mixing bowl, beat egg whites using an electric beater. Add the other half of the sugar slowly and continue beating until the egg white reaches stiff peaks (When you lift the beater, the tip droop slightly, and beaten egg whites becomes stiff and shiny).
  8. Add toasted nuts and chocolate chips into the cake batter.
  9. Fold in beaten egg whites into the cake batter, in two to three additona, until egg whites is well-incorporated into the batter.
  10. Pour batter into prepared pan. Bake in preheated oven at 160C for about 50 minutes to one hour (I used 45 minutes).

This recipe was shared by my sister-in-law who attended a demo class. The steps were tedious but it's worth the effort. It has the richness of a butter cake but the addition of beaten egg whites helps to add lightness to the cake. It's called the combination method as I've read here and here. However, do prepared to do more washing unless you have two beaters. Alternatively like me, I use hand power to do the beating of butter-sugar-eggs-flour. :)

I've been tagged by Yuri and Missy, two wonderful food bloggers to do a meme.

Here are the rules to observe.1. Link to my blog (tagger) on your blog. 2. Give seven facts about yourself. 3. Tag another seven blogs by leaving a comment on their blog and letting them know they were tagged and listing them (and their blogs) on your blog.


  1. I love walking and shopping alot and will not get tired even though people around me already are.

  2. Whenever I visit Daiso, I never leave the place empty handed.

  3. I love to eat bread and sandwiches - alot. :P

  4. I've just started to know how to swim (not entirely but almost) recently. Hehe.

  5. I'm quite a petite girl at 1.56 m (but I'm not skinny though I wish I can just be a little thinner). :P

  6. I'm using a Sony T20 digital camera (white) which I bought a year ago. I bought cos' I decided to have my own blog and chose it cos' of its sleek design. Now, the camera has to acccompany my every baking/cooking session.

  7. My name, Aimei (when translated in chinese) means - love to look pretty. Hehe...since young, people have been teasing me but I'm used to it and I actually quite like my name now. It's a nice and easy name to call and be remembered. :)
Wow...I think the facts are really random! I just jot down whatever comes to me now. I'll try not to tag those who'd already been tagged. So I'm tagging:

Happy Mrs Kwok
Bernice's Baking Journey
OvenHaven
Berenice's Sweets for Treats
Stella's Sweet Temptations
Happy Love Strawberry
Sweet Almond


Have fun!!

November 10, 2008

My Favourite Pasta again - Seafood Aglio Olio


When it comes to food, I admit I can be quite boring (choosy). If I like something, especially anything that's healthy, tasty, and I can indulge without much guilt, I can order the same food over and over again. :P

I'd mentioned before that my favourite pasta is Aglio Olio. This is actually not that of a healthy dish if there's lots of oil in it. But I just love it's simplicity (to prepare) and garlic-oil tossed pasta. It is very versatile and you could add anything from chicken, bacon, seafood or grilled veggies. I'd tried different versions from different cafes and they were all so good. I do not know whether cheese is common in this pasta but a sprinkle of grated cheese definitely spices up the flavour! After reading in a chinese food magazine introducing seafood Aglio Olio, I set myself to make it one Saturday.

I have only limited ingredients in my pantry so a simple seafood (prawns) pasta was all I can came up with. This is a simple dish, everyone can do it!

First, prepare all ingredients - Cook the pasta, shell the prawns, diced garlic finely.
Heat wok and fry garlic until fragant. Add prawns and stir-fried for a while.
Remove the prawns. Tranfer prawns to an oven and grill for about 10 minutes for about 180C. (I wanted to achieve the charred-grilled effect)
Add cooked pasta into the garlic mixture and mix evenly. Add salt and pepper to taste.
Add dried chilli flakes and fresh herbs (if you have). I also added some crunchy salad toppings of seeds and nuts.
Serve pasta hot, with grilled prawns.
The above was how I prepared the dish based on estimation. :P Sorry that I did not provide any detailed recipe as I made only small serving of two. The pasta came out to be a little bland though. :P


Once again, I hope to share this with Presto Pasta Night. Coming week's will be hosted by VanieljeKitchen.


November 2, 2008

Easy Shanghai Pancakes


I was in the mood to make myself breakfast yesterday. I browse through my recipe books and decided to make this shanghai pancakes. This is so easy and I have all the ingredients on hand. It doesn't require milk or buttermilk which I'd run out of so this recipe is just perfect!
Shanghai Pancakes
Ingredients:
110g All-purpose flour
1/4 tsp salt
1 egg, beaten
250ml water
2 tbsp white sesame seeds, roasted
Cooking oil
Red Bean Paste/any fillings of your choice
Method:
  1. Sift flour and salt into a deep mixing bowl.
  2. Make a well in the centre, then add beaten egg and half of the water.
  3. With a wooden spoon, gradually work in the flour from all sides.
  4. Pour in remaining water and sesame seeds and mix until batter is smooth. Allow batter to stand for about 30 minutes.
  5. Heat about 2 tsp oil in a small frying pan.
  6. Add about 3 tbsp batter and cook pancakes for 1 minute on each side until both sides are brown. Transfer to a plate.
  7. Repeat until all batter is used up (Add more oil as required).
  8. Spread pancake with bean paste and fold in half. Pan-fry each folded pancake on both sides quickly to make them crisp.
  9. Serve immediately.
Recipe Source: Mini Cookbooks Series - Desserts
This makes about 5 pancakes depending on your thickness. The pancake is plain so when eaten with the red bean paste, it is not overly sweet. I added chunky peanut butter as well. :) Do eat it immediately while it's hot cos' that is when the pancakes are very crispy.

October 26, 2008

Quick Breakfast Fix - Cranberry Scones

I'm always happy whenever I get the chance and in the mood to making my own breakfast. By that I don't mean the normal cereal, or peanut butter on bread. I mean from scratch - bake my own. Although this is nothing new, but to bake and enjoy it while still warm right out of the oven is not something I get to do often.

After a failed attempt at macaron making (I could have used the wrong proportion of ingredients - which I shall not mention in detail for now, will save it till my next successful attempt ;) hopefully soon), I just felt that I have to bake something to appease for not having bake a successful item for the week. Thus, I made a switch from my usually weekend breakfast routine which is usually eat-out at my neighbourhood food court and decided to bake some easy scones for breakfast.

Scones belong to the 'quickbread' category and you don't need alot of time to put up all the ingredients. My preparation time was just about 15 minutes and another 20 minutes of baking time and there you are! Warm scones for breakfast. :) While there are many scone recipes around, I chose one with the most basic ingredients, and to me it tasted no less inferior as compared to those I'd at bakeries before.

Cranberry Scones

Ingredients:

280g all-purpose flour
65g granulated white
sugar (I reduced to about 55g)
2 1/2 tsp
baking powder
1/4 tsp salt
76g cold unsalted
butter

50g fresh cranberries, cut in half (I used dried cranberries)
50g mixed candied fruit and peel (I omitted these)
160 - 180 ml milk
25g sliced almonds (I omitted as I did not have it. I replaced with walnuts)

Method:

  1. Preheat oven to 200°C. Place rack in middle of oven. Butter or line a baking sheet with parchment paper.
  2. In a large bowl, whisk together the flour, sugar, baking powder and salt.
  3. Cut the butter into small pieces and blend into the flour mixture with a pastry blender or rubbing it with your fingers if you do not have a pastry blender. The mixture should look like coarse crumbs.
  4. Gently stir in the cranberries and mixed fruit, making sure not to crush the berries. Add the milk and stir until just combined. Do not over mix.
    Gently
    knead the dough on a lightly floured surface. Roll or pat the dough into a circle that is 8 inches (20cm) round and about 11/2 inches (3.75 cm) thick.
  5. Transfer to the prepared baking sheet and then brush the scone with milk.
  6. Using a sharp knife, score the top of the scone into eight triangles and then sprinkle with the sliced almonds. Alternatively you can cut into rounds using a round cookie cutter of about 2 1/2 inches in diameter.
  7. Bake for about 20 minutes or until lightly browned and a toothpick inserted into the center of the scone comes out clean.

Recipe Source: Adapted from Joy of Baking

Note: Original recipe includes popping the baked scones under the broiler which I did not.

I usually don't like to have too heavy breakfast thus i just have mine with tomatoes left from the tomato omelette (below). I think I had something (refering to tomato baked with cheese on top) like this before at some cafes serving breakfast but I couldn't remember where it was :P
I made tomato omelette to go with the scones for my mum. I liked how the tomatoes made the omelette more juicy as compared to the usual scrambled egg I fried which was always too dry. I prefer wetter scrambled egg. :)

October 16, 2008

Compilation of Recent Bakes

Over the past one month, I've been trying out different recipes, taking photos, sorting out my photos...but simply no time to do much posting. So, I thought of just sharing some of the items I'd baked recently which I think are worth recommending. :) They were all taken from some of my favourite blogs.
This raisin loaf, as you can see, hasn't got many raisins cos' I had only a little left. The recipe was taken from my favourite blog, as usual, Happy Homebaker. I did not make any adjustment to the recipe, except that I used the bread machine only to knead the dough, the proofing, shaping and baking were all done out of the machine.

Although the ingredients are very basic, as it does not contain eggs, or milk, but only milk powder and water, the bread turned out surprisingly soft even for a few days. Ironically Happy Homebaker left a comment on my flickr asking me to teach her how to make this soft bread; and I replied her that hey this recipe's actually from you! :D


These cute doggie cookies were from Happy Homebaker as well. I made the first batch of Holicks flavour but found that there wasn't enough to go round for my nephews and nieces on children's day. So I made another batch using milo.
These cookies were crunchy on the outside, and the interior had a sandy texture that melts in your mouth. I prefer the Holicks version. :)


Lastly, these green tea melting moments were on my to-do list for quite some time. I immediately bookmarked after seeing Mandy's post. Although I did not really manage to capture through the photos how good it was, just try it and you will know (Provided you are a green tea lover). :)
I made this as a little gift for my friend, Xiuling's birthday. Hope she likes it. :)

October 14, 2008

Baking for a Good Cause

Isn't it great when you are able to do something out of your interest, and at the same time make a little contribution to the needy? Killing two birds in one stone, yea? ;)

My company holds this 'Charity Breakfast Event' every year where we sell our breakfast to company staffs and the proceeds will go to the charity. Breakfast items can be anything, from homemade to pre-order stuffs. Of course homecook dishes can reap more profits, with lower capital involved.

When I saw this email circulating, I was so excited and immediately contacted the person in charge to find out more. This is a great opportunity for me to put my passion to a meaningful use. Baking for charity! :)

There were many excellent cooks (my colleagues) who made delicious hot, piping breakfast items such as yam cakes, curry, bee hoon , glutinous rice etc. I really applaud their time and effort cos' they had to wake up early in the morning to prepare all the food. For me, I was already drop dead tired after using my whole of the weekends to bake cookies and cakes.

To be frank, I was initially hesitant whether to participate in this event. This would be the first time I'm actually selling my bakes to the public. What if I couldn't manage to bake the required quantity as planned? What if people finds my cakes not tasty? What if I make too little/too much?? These were all the 'what ifs' hovering in my head. Thanks to dd for his encouragement, and the support from my close colleagues, I decided to go ahead with it. Afterall, if I don't try, I would never overcome the initial hurdle.

One of my dear colleague, who shares this same interest in baking, offered to help me with the baking. We spent the entire Saturday baking chocolate chunk and almond cookies. It was loads of fun, undergoing QC for the size per cookie, rolling the dough, packing into cookie bags and discovering the 'scheming tactics' in businesss. We are learning to be future entrepreneurs :P
This is a very rich, yummy indonesian walnut cake. Although the method is more tedious (Uses a combination of creaming method, followed by beatng of egg whites to stiff to be folded into the creamed mixture, this produces a rich, yet soft-textured cake).


The actual day on a Monday morning. I was too busy tending to my stall as well as patronising other stalls that I've forgotten to take pictures of other yummy goods! It was only a short 1 1/2 hour event. We were overwhelmed when our bakes were sold within about an hour! (Actually that's because we did not make alot, hehe!) It was my first time thus I couldn't gauge well the amount I should make. Anyway, I felt that the quantity was just nice, if not just a little more would be sufficient as the crowd started to disperse at around 10am where everybody have finished buying their breakfast.
I was glad I plucked up the courage to give it a try, as it boosted my confidence to bake for more people. More importantly, we managed to raise some money for charity. :) Oh I forgot to mention that if not for my supportive colleagues and some bosses, I guess the cookies and cakes would not be able to be sold within such a short time frame! :D

October 3, 2008

1 Year of blogging & my Macaron Challenge!

How time flies...I couldn't believe that I've blogged for 1 year, which means it's already 12 months; or 48 weeks!

This 1 year happens in such a swift, that I actually find it rather short for me. I feel that I've not baked enough, or have accomplished much in baking or cooking. There are still many recipes which I have yet to try (though it's never-ending and the list just keeps piling up) and for certain baked items such as chiffon cakes or a properly frosted celebration cake, I've still yet to 'conquer' and baked to perfection.

I wished I had more time and energy to practise on my skills to bake beautiful and yummy goods, But, there are limitations since I only do baking as a hobby. There are many committments and activities that I also wish to enjoy, blogging being one of them, though it's rather time-consuming thus I'm not able to blog about my kitchen happenings that often. Nevertheless I'm glad that I've started this blog although I was rather uncertain one year ago.

This blog has affirmed my love for baking. Now I know I'd never get tired of baking or feel like stopping anytime. In fact I enjoy more than before. I've also taken much interest in cooking, to know more about the types of ingredients, condiments, herbs and methods of cooking, and to enjoy the whole process of cooking my own healthy meals. I'm now able to work more efficiently in the kitchen, as compared to many years back when I need to prepare meals for my mum after she was out from hospital.

This blog has allowed me to meet many wonderful people out there who shared the same interest as me, and whom I've learnt and draw inspiration from. Thanks to all out there who have helped me in one way or another. :) I'd continue to keep this blog going and learn as I go along. I aspire to be able to bake and cook yummy, healthy or sinful dishes for my love ones!


To give myself a little pamper, I'd actually wanted to bake a cake for my blog's one year birthday in Sep. hehe. But somehow for the past few weeks, I just don't feel like having a cake. I'm not a cake-lover anyway. I love baking before I actually love cakes :P. So I decided to bake something challenging - something I love to eat, had always wanted to try but kept putting it off. Yeah, that's macarons!

I fell in love with it after I first tried it at Bakerzin. Thereafter, I had tried it at different outlets. I told my dd that I wanted to try ALL the flavours that is available. Hehe...greedy right.. :P Though many had done it with success, the thought of having to deal with egg whites just scares me off. But this time round, I decided that I shall try making it for myself. :)

Here comes my challenge!


This was my very first attempt. I admitted that I did not do much research prior to making it. As it was my first try, I did not want to make any changes to the recipe. Thus I followed the full recipe using 100g of egg whites. It's a huge recipe, thus I really had difficulty getting the ground almond-icing sugar mixture through the sieve (mine has rather small holes). In the end, I gave up and went ahead with some sugar crumbs. But I guess that's not the real reason. The batter was thin and it spread a lot. The macarons cracked badly and no feet was developed. :( But as a chocolate lover, I did not discard it. They were still good cookies, but too sweet for me.

For my second attempt, I tried another recipe using only 1 egg white. Everything went smoothly, until I realised that the caster sugar required in the recipe was to be added during the beating of the meringue and not to be added together with the almond-sugar mixture! What a muddle-head I am! I did feel puzzled when I saw castor sugar being included in the recipe (for macaron, almond is always mixed with ICING sugar), and I should have been more alert to read the recipe once more. Result? Haha as you can see, big holes throughout the cookie, not even to mention whether there's 'feet' or not cos you can't tell. LOL. It actually resembles the almond crisp I've made previously.

FINALLY...

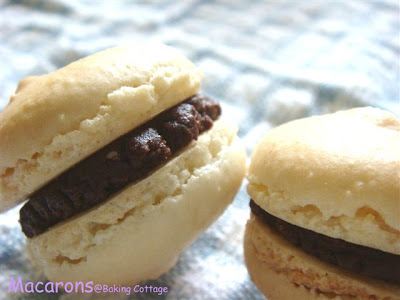
After two times of failure, I gone into more research, and try to analyse what probably might work for my oven. For this final trial, I used the recipe from here. Duncan Markham provided a very detailed write-up on macaron making, with pictures to show how would the correct batter (before piping) and a successful macaron would look like. He also mentioned the few methods which you could try. Do read his write-up for clearer explanation.

When I saw the piped macarons, my confidence was boosted a little as it was similar to what Duncan Markham showed in his write-up. The batter should be thick (but of piping consistency) with an ivory colour (if you are making plain ones).

It was really amazing that the 'feet' started to appear at around the 3rd minute. I followed his advice of opening door after 5 minutes as my oven tends to be too hot. The temperature of my oven actually fluctuated a lot but I try not to get distracted by that as I could only continue with the baking. I realised for those that were further away from the oven door, the macarons actually swayed sideways, i.e. only one side of the macaron developed feet while the other didn't. This was one of the problems that Duncan troubleshooted and what he could only advised was to let the piped batter rest a while before baking (which I did).

Still, I'm a happy girl cos' I finally get to make my own macarons, and more so happy when others tried and said it's nice (but too sweet which I found so too). I won't consider it a success for now since I have not had repeated success. But I would want to try out other flavours again. :)

Some useful info on how others had attempted this, you could see also here, here and here.