February 14, 2010

Gong Xi Fa Cai!

Pineapple tarts! How can any chinese family miss out this traditional delicious new year goody? With a doubt this has to be on top of my priority to-bake list for cny. Last year, I made my own pineapple jam and the results was so much better than store-bought jam that I 've told my mom that this year, it has to be home-made jam again. However, work has been so busy for me this year that I was happy to have the time for pineapple tarts. I just had to make do with store-bought because it would be so much convenient for me.
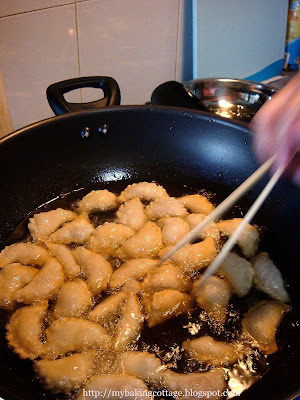
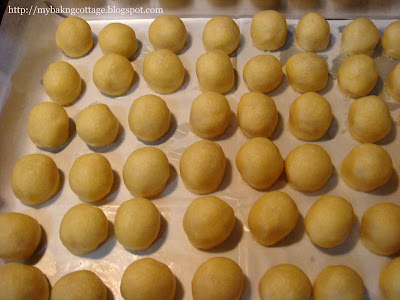
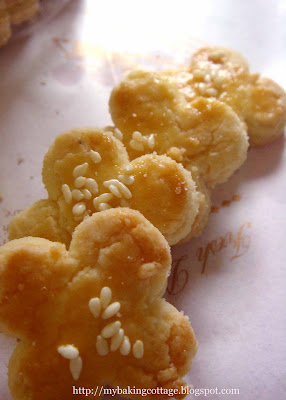
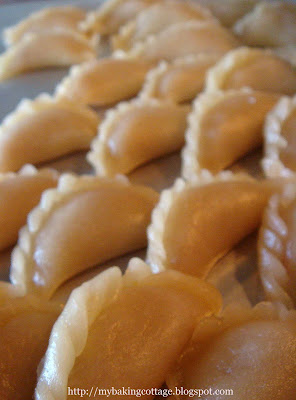
I bought one packet of 1-kg pineapple jam from Phoon Huat (Redman brand) and was planning to make open tart style and the closed version, but the jam was just enough for three tubs of closed version so that was all I made this year. I attempted to measure the weight of the dough and pineapple jam so that each and every tart would be identical. I used 6g or 7g dough vs 6g or 7g jam and Im pretty satisfied with the thin crust I got this year. :)
I used to receive comments that my pineapple tart had too little jam but this year I received other comments such as they prefer more crust than jam. *lol* Well so it all boils down to personal preference. For me, even though I don't really fancy eating a lot of the pineapple jam, I think a thinner crust makes the tarts appear more 'professional looking as there has been effort put in to mould each tart into even shapes and with generous amount of filling (jam). :)


My recipe was from none other than Oi Lin's
Delicious Asian Sweet Treats and the tarts were very buttery and melt-in-your mouth. Personally I have tried a couple of pineapple tart recipes before and I would say most are good in their own way. I emphasise using good quality ingredients especially butter since butter is the key ingredient in pineapple tarts.

The clock had struck midnight and it is now 大年初一﹗
祝大家在虎年里身体健康﹐心想是成﹐步步高升﹐恭喜發財﹗

February 12, 2010

Almond Cookies

Among the many new year cookies, one of my favourite has to be almond cookies. I find that there are so many forms of almond cookies that I am always eager to try any types that is labelled "almond cookies" whenever I walk past shops selling new year goodies, without buying of course. :P

I have been making this almond cookie over the past few cny and even during non-chinese new year period because it is really delicious and crunchy. This year, I wanted to venture into new almond cookie recipes. I recently bought Oi Lin's recipe books on Delicious Asian Baked Treats and Delicious Asian Sweet Treats which features loads of Asian treats such as your usual pineapple tarts, egg sponge cakes, cny cookies and many more. I wanted to try most of the new year cookie recipes in her book but I only managed to try some of them his year. This is one of the almond cookie that I've tried from her book. The result is rich and crumbly and certainly worth making. This is similar to the one I've been making but it uses a mixture of almond meal and flour while the other (originated from Florence's blog) uses only flour but with lots of toasted almond nips. I actually prefer Florence's recipe because the almond nips makes the cookies extra crunchy!

The other almond cookie from Oi Lin's Asian Baked Treats is this almond cookie with nut topping. This recipe uses ghee instead of the usual butter or oil. Intially I was quite skeptical about using ghee because I always thought this is much more unhealthier, until I did a googling and understands that ghee is actually clarified butter, where the milk solids and impurities have already been removed. It is however not explicitly clear whether ghee has any difference (if any) in terms of its health benefits as compared to butter although some sites do claim that ghee is healthier than butter because of its lower fat content.

Mixing the batter of this was so easy because ghee is much softer. You literally just need to mix the ghee with sugar and salt well and fold in the other ingredients as you would usually do when making a standard cookie batter. The ghee smelt rather pungent and I was so worried that no one would dare to eat it but hey I'm wrong!

When baked, the cookie was so fragrant, once you pop a small morsel with an almond into your mouth, you just can't stop!

almond cookies with nut topping

  • 120g untoasted whole almonds with skin
  • 100g ground almonds
  • 180g unsalted ghee
  • 130g caster sugar
  • 1/4 tsp salt
  • 1 tsp vanilla essence
  • 250g plain flour
  • Glaze: 1 egg yolk mixed with a few drops of water
  • small paper cases
  1. Preheat oven to 180°C.
  2. Toast whole almonds for 10 minutes and ground almonds for 5 minutes. Set aside to cool.
  3. Mix ghee, sugar, salt and vanilla essence. Add cooled (must be cooled) ground almonds and mix well. Sift flour over the ghee mixture. Fold the flour into the mixture and bring all ingredients to form a dough.
  4. Scoop one level teaspoon of dough, shape it into a ball and place n a paper case. Arrange on a baking tray. (according to Oi Lin, these cookies must be baked in small paper cases. Otherwise the cookies will spread and result in thin and hard cookies)
  5. Bake cookies in preheated oen at 180°C for 10 minutes. Remove tray from the oven and glaze the cookies with egg yolk. Place a whole almond on every cookie. Bake for another 10 minues. (Note, you should place the almond immediately once you glaze the top. Otherwise if yu glaze all the cookies at one time, the earlier ones that you have glazed would have dried up and the almond would not stick into the cookie.
  6. Allow cookies to cool completely on a wire rack before storing.

Recipe from: Oi Lin's "Delicious Asian Baked Treats"

February 7, 2010

Must Try Peanut Puffs!

The peanuts puffs that mom and I made last week were so good and my dad like it so much that last weekend, we decided to make it again. Two tubs were gone in a week and I had not even let dd try it. So I had to "turn down" others in my "to-bake list" to make way for this golden puffs because time is just so precious for me. I'd save my kueh bangkit/ suji cookie / walnut cookie for next year!

Hands-on experience beats everything even if you read a recipe a thousand times. Probably also because this time, we did it in the day time when our energy is still at its peak so everything went smoothly and I could handle the dough much better and faster. I had more strength to roll and re-roll the dough which gets tougher each time i gathered the left-overs from the cut-out rounds.

The wrapped puffs looked so much nicer because I finally mastered the technique of folding the pleats after a few ugly attempts. Oi Lin's video posted on her blog also helped alot. I learnt to wet the edges of the cut-out rounds with water so that it can be sealed easily.


Mom was camera shy so I'm not allowed to take take a shot of her. :P
I rolled and cut out the shapes in the kitchen while she wrapped the puffs in the living hall where it is much cooler. Altogether, you need to prepare three clean, white cloth - one to cover the dough after mixing because I don't have a large work surface, so I divide the dough into several portions for rolling and cutting; one to cover the little round cut-out shapes and the last one to cover the wrapped puffs before frying. This is to prevent the dough from drying out.


These were my first attempt, of different shapes and sizes! Nonetheless they were still so good. ;)

I hope I am still not too late to share this recipe because this is just soooo good! If you still have a bit of time to spare, do do try this! The crust has this flaky texture that is crispy and it just crumbles in the mouth. Ok, enough said, here's the recipe. :)
560g plain flour (original recipe uses Hong Kong flour but plain flour works just as good in my first attempt so I'm gonna stick with it)
17 tbsp peanut oil
14 tbsp water
150g ground peanuts or peanut powder
100g caster sugar
Peanut oil for frying
(1 litre of oil is needed for this recipe, inclusive of the above 17 tbsp oil)
  1. Mix ground peanuts with caster sugar and stir well. Set aside.
  2. Add peanut oil to flour and mix. Add water gradually until a dough is formed. At first, the water may seemed too much and the dough is very wet. Just continue kneading and eventually all the water will be absorbed and dough will become smooth and non-sticky.
  3. Roll the dough thinly with a rolling pin. Just roll it as thin as you can without tearing and you are still able to wrap it without tearing, about 2mm.
  4. Cut out round shape with a cookie cutter. (or use a glass like I do!)
  5. Spoon a small amount of peanut filling onto the centre. Dab the edges with water. Close up to form a semi-circle. Using your thumb and index finger, flatten the edge. Then pinch to form a pattern. I strongly recommend you to watch the video here. It helps alot.
  6. Set aside in a covered container to prevent puffs from drying out.
  7. Heat peanut oil in a wok. The oil should be medium hot and depth of at least 4cm. Deep-fry the puffs till golden brown.
  8. Place the fried puffs on paper towels to soak up excess oil.
  9. Let the puffs cool completely befoe storing in an airtight container.
The recipe is based on Oi Lin's "Delicious Asian Sweet Treats" with my own modifications. I have doubled the recipe and yields about 110 to 120 pieces.