November 9, 2011

Birthday Cake for Mummy

I came to realise how time passes so fast when one gets busy. It's not just fast, it's extraordinarily fast! Before I could fulfil the tasks that I set for myself, one week, two weeks and so on just passed without having it accomplished. argg... my wedding is coming in 2 months time and just yesterday, I wrote down the list of things I have to prepare. Gosh it seems little yet so much... at least it provides some direction of what to do next.

For the whole of last month, I didn't post a single blog entry as I was just so busy. I think that's the first time I miss posting in a single month. The good thing was, I wasn't busy the entire month working and slogging... I took a break. :D It was my first trip (not to mention genting highlands in Malaysia) for this year and was really looking forward to it! I was away for a 7 days trip to Taiwan, with my mum, my best friend and her mum, and my in-laws. It was meant to be me and my best friend bringing our mothers for a trip, and ended up my in-laws joined in as they had not gone for a trip this year and their children (including my hubby) probably was unable to fit in a schedule to bring them for a tour. So well... I felt I did a great thing for my hubby! :D

No bakes for the past month, as far as I can remember, except for an awesome steam chocolate cake which I had no choice to take a picture of. This cake (below) was a birthday cake made for my mum in Aug. I adapted from the Japanese strawberry shortcake that I made for Xian, and made it into a cherry version, my using canned cherries for the layers and topped with fresh cherries and white chocolate shavings.

I wasn't pleased with the presentation, though the cake tasted quite yummy!


Two months 5 days to my wedding! My house renovation has completed and we are doing the cleaning up and awaiting the arrival of the furnitures, etc. My kitchen Aid and oven has arrived and sitting in my new kitchen! I'll update when the house is clean. ;)

September 18, 2011

Pre-wedding Photoshoot Prelude

It has been a long time since I last update the progress of my wedding preparation. Well, in fact it has almost come to a halt since my ROM last year. Since the beginning of this year, way before we collected the keys to our nest, we kept ourselves busy with sourcing for renovation contractors / interior design firms, furniture / appliances shopping, etc. Most of our friends are really amazed to see that just shopping for a simple dining light could take us months to decide. The shop assistants in Balestier could even recognise us at the bus stop because my hubby went to Balestier too many times! *lol* Anyhow, we enjoy this process because those weekly hunting has become our dating affairs :) Both of us are rather picky (especially me) so we'll rather spend more time than to regret for not having browse enough. Since our schedule to our wedding has been planned well ahead, why not? :)


Our house is almost 50-60% completed, sans the carpentry which would be installed very soon. It was rather draggy though due to some hiccups in our flooring and our design concept. ;) I am looking forward to see some carpentry work done up this week and hopefully by Nov, we can start to do the final touches. Then, we'll be able to focus on our wedding held in Jan 2012. Oh gosh, just realised it's less than 4 months to our wedding. :D


Opps I digress again. I should be taking about my pre-wedding PS... :P Our PS was on 15 Sep 2011. It was a hazey week, with the island experiencing a higher than usual PSI on 12 Sep, few days before our PS due to the Sumatra fire; and heavy rain hit parts of the island the day before. NEA weather forecast showed that on the day of our PS, rain was expected in the late morning / early afternoon. It did, followed by fine, clear weather. We were so lucky! We even managed to capture blue sky in botanic garden. :D


Here are some of the shots taken not by the photographer, but my best friend aka da jie using her iphone 4. The first photo was taken in the studio. I love the white background.

This is retro doesn't it. My boss exclaimed: Oh my botanic garden time! *lol*

This was in botanic garden as well, the man-made waterfall.


Another shot in botanic garden.


Botanic garden was our first outdoor location, after which we proceeded to the shophouses along Tanjong Pagar area, and landed at our last stop at Sentosa for sun set shoot. As much as I wanted to be creative and wish to avoid the more common PS locations, we still settled for these safe, yet beautiful locations, as Singapore is really that small.


Although it was really tiring, we really enjoyed the PS (especially me!). :P In fact i had a crazy idea - to do another "post-wedding" PS during our honeymoon. *wink wink*. Well... we shall see how... We'll be able to choose the photos in a few weeks time. I'm determined not to allow myself to top up extra photos over the package of 44 that I am given. $85 for each extra photo? I would rather sign another package. :)


August 27, 2011

Mini Walnut Tarlets

As I mentioned in my earlier post, I hardly bake tarts; and here, you see me posting two tarts in a row! Well, since I seldom baked tarts, I thought I'd make more tart shells at one go on the day when I baked the milky fruit tarts. I doubled the tart shell recipe that you see in my fruit tart post, and managed to make extra 12 mini and 3 medium size (those standard egg tart size) tart shells, which I stored in the fridge and baked them a few days later.


I had earlier eyed on the caramel nut tartlets by "Okashi Treats" by keiko ishida. It looked so tempting for a nut lover like me. The steps however, were more tedious -- involves poping the tarts into the oven twice, and making of two creams - almond and caramel cream. However after a long, tiring day at work, I decided to tweak another simpler pine nut tart recipe, and made a walnut tart instead. That's how baking has become so restricted for me because of my work. But I can't blame anyone or anything. It is my job and I'm getting paid for it while baking is still a hobby.


I didn't regret making the walnut tart because it was a really delicious tart that I couldn't help but devour the entire tart when I'd restricted myself to only eat half of it! Best of all, I get to used up all the nuts I had in my pantry and the whipping cream left from the strawberry milk tart. This is definitely worth making if you love nuts. :)


Recipe for Tart Shell (sweet shortcrust pastry) -- Please refer to the milky fruit tart recipe

All the steps remains the same, except that you've got to cut out little rounds of pastry with round pastry cutter or cut out a portion and pressed it into the tart tin. Bake for 10 minutes (instead of 20 minutes), removed from the oven, remove the weights and bake for another 10 minutes or until the tart turns light brown.

Recipe for filling:

50g castor sugar
30g ground almonds
1 egg
1 egg yolk
140g double cream
1/2 tsp vanilla extract
70g pine nuts


To assemble:


  1. Prepare sweet shortcrust pastry (baked in advance).


  2. Prepare filling: Mix sugar and ground almonds together. Add egg, egg yolk, cream and vanilla extract and mix until incorporated. Do not over-mix.


  3. Preheat oven to 180 degree celsius. Spread nutella over the base. Pour filling in, then spread nuts evenly on top.


  4. Bake for 15-20 minutes until tart is golden brown. remove from heat and leave to cool on a wire rack.


Recipe adapted from: "Okashi Treats" by keiko ishida

The original recipe is a pine nut tart recipe. I replaced pine nuts with walnuts, and strawberry jam with nutella. I was lucky that this tart turned out successful, for I made a huge blunder. For a moment, I thought that I should pour in the egg-cream mixture and baked it with the shell together. So, after I almost filled up all the tiny tins with the mixture, I realised that nope, the recipe requires that the shell has to be baked in advance. Oh gosh! Worried that the tart will not bake well, and because I had pricked holes in advance on the prepared tart, I scooped off the mixture again, sent into the oven to bake for 10 minutes, removed from the oven, topped it with the egg-cream mixture and baked for another 20 minutes. Phew! everything turned out fine, much to my delight. hehe. I love it, the texture of a moist creamy centre with crunchy nuts on top!
I am submitting this to Aspiring Bakers #10: Easy as Pie (August 2011), hosted by Janine of Not the Kitchen Sink! This is the first time I am submitting two entries to Aspiring Bakers ;)

August 9, 2011

Not a cake this time but a milky fruit tart!

Yes yes... it's not a cake this time round. I made a tart! If you notice from the sidebar category of my blog, you could see that I hardly bake tarts, in fact there's only three tart posts! Somehow tarts don't fall in my "to-bake" list. I still prefer cakes, whether making it or eating it. If they do appear, then very likely, it is for someone than for myself. Haa, I don't know either why I don't like tarts, probably it's the rolling of pastry dough and lining over the tart shell that appears intimidating to me. Usually when the dough gets softened, it gets so difficult to line on to the tart tin with breaking.


I made this milky fruit tart to bring to my sisters' gathering, to celebrate a belated birthday for Xian. Instead of baking a cake, I decided to bake a tart for her since I'm always worried about cake melting during the journey to our meet-up venue; and I know she love pastry tarts too. :)


Dailydelicious's strawberry milk tart caught my eye and I love the white chocolate fillings that she used. It's kind of a white chocolate ganache. I don't know about my friends, but as a personal preference, I don't really like pastry cream which tasted too sweet and "eggy" for me. For the tart shell, I chosed the sweet tart dough by "Okashi Treats" by keiko ishida.


I missed out last month's Aspiring Baker's on swiss rolls though I did bake a swiss roll last month. Coincidentally this month's challenge Aspiring Baker #10 - Easy as Pies (including all tarts, quiches, etc) came just in time for me. Hence I am submitting this to Aspiring Bakers #10: Easy as Pie (August 2011), hosted by Janine of Not the Kitchen Sink!;)


Here's the recipe for the sweet short pastry:


  • 70g unsalted butter


  • 35g icing sugar


  • a pinch of salt


  • 1 tsp vanilla extract


  • 20g ground almonds


  • 130g cake flour, sifted


Method:


  1. Beat butter, icing sugar, salt and vanilla extract with an electric mixer until just combined.


  2. Add eggs and mix well. Add ground almonds and mix well.


  3. Add flour and fold through completely. Using a scraper, mix batter until a smooth dough is formed. Wrap dough with a cling film, then place in the refrigerator to rest for at least 3 hours. (i only let it rest for 1 hour, probably that's why my dough is more difficult to be rolled).


  4. Unwrap dough and place on a non-stick baking mat . Cover surface with cling film and roll to a thickness of about 3-5mm. Remove non-stick baking mat and place dough (with cling film still intact) into the tart tin and gently press it into the tin without stretching it. Remove and discard cling film.


  5. Roll the rolling pin over the top pf the tin to remove excess dough. Prick dough with a fork, then let dough rest for about 5 minutes in the freezer before baking.


  6. Preheat oven to 180 degree celsius. Line tart tin with parchment paper. Place baking weights or rice into tart tin and bake for 20 minutes. Remove weights when pastry just begins to change colour around the edges, then continue baking until light brown, about 10 minutes more.


Recipe adapted from: "Okashi Treats" by keiko ishida


Makes one 20 / 22-cm tart tin with fluted edges. I used 18-cm tart tin and two additional smaller tart tin.

The pistachios not only visually enhance the lovely tart, it adds a nice nutty crunch to sweet and tarty taste. The combination is heavenly!


Made two extras for my mum and hubby. :)


The white chocolate cream filling with speckles of vanilla seeds from the vanilla extract. I thought it looks better without the speckles.

I learnt from Dailydelicious that we could make the glaze from our usual fruit jam without having to buy the gel. Please refer to her blog for the white chocolate cream and strawberry glaze recipe. :)


Do try this lovely tart! I'm sure all ladies will love this! ;)

July 17, 2011

Cranberry Scones

Hi to all of those who do still pop by my blog, I know I've been missing for some time... but it doesn't mean that I've ignored this blog or my love for baking. I still do, but as some of you may know, I'm busy both in my work and my wedding/house renovation.


In the past, I may complain that I'm too busy to blog but I still do bake. Now, I don't even have the luxury to go blog hopping, let alone bake and blog. This post was put up a few weeks ago, when I sneaked in some time to post the pictures, and sneaked in some time to type out the recipe and finally here I am now, determine to finish it today, to at least post one entry for this month, and hopefully more! I made this almost 2-3 months ago. This falls in in 'quick bread' category and that was why I chosed this. I named it Scones ~ bakery aroma cos' the kitchen was full of bakery aroma that I felt this was real bakery, attributed to butter and cream. ;)


You can bake this in advance, cool and store in the refrigerator. Before serving, just pop into the oven or toaster and you get the bakery aroma again!


I shall leave the rest with the pictures and the recipes. :)


Ingredients:


220g plain flour

1 tbsp baking powder

80g unsalted butter

30g castor sugar

1/2 tsp salt

110g of egg yolk and milk mixture (1 egg yolk with enough fresh whole milk to make up the amount. I combined with leftover whipping cream and some low fat milk to make up the 110g)

40g cranberries, chopped


Method:


  1. Prepare flour and butter a day in advance. Sift flour and baking powder together. Place butter and flour together in a plastic bag and chill in the refrigerator overnight. (i omitted this step).

  2. On the day of baking, preheat oven to 200 degree celsius .

  3. Add sugar. Rub butter into the flour until mixture resembles coarse breadcrumbs.

  4. Add cranberries together with egg yolk and milk mixture and mix until a smooth dough is formed.

  5. Place dough on a floured surface and knead lightly.

  6. Rolled to a thickness of about 1.5-2cm.

  7. Cut with a 5-cm round pastry cutter dusted with flour. Alternatively if you prefer to shape into wedges like mine, you could roll into a circular dough, and cut into wedges using a pastry cutter.

  8. Place cut-out dough on a baking sheet brushed with milk.

  9. Bake for 12-15 minutes until scones are golden brown.

  10. Remove from heat and cool on a wire rack.

Recipe adapted from: "Okashi Treats" by keiko ishida


Some updates about myself. My renovation is going smoothly and it's really excited to see more things done every other day. It is a tiring but enjoyable process... but I really do miss baking... alot. In fact I had a few arguments with my hubby because he wanted me to spend less time on baking and reading baking blogs but to spend some time to think and surf the web for ideas on what design I wanted for our house design. *lol* I was rather stubborn at first thought of it but I do understand his intentions. Afterall, he wanted me to have our dream house and would have no regrets in the final outcome. Anyhow, I discovered he is a perfectionist when it comes to this big project of ours but I appreciate that as I could see that all he wanted was to ensure that I'm happy with the choices that we have made, in terms of colour scheme, design, layout, etc. :)


June 25, 2011

Pretty pink and white :)

Pink and white, is a colour combination, I'm sure, that can't go wrong. It's either you like it or you don't. You can tell from my blog that I love this colour combination, and this is likely what you will see in my kitchen. Hehe. I'm contemplating to do a pink coloured glass backing for the backing of my kitchen countertop, to match my white kitchen concept and pink kitchen aid. ;) To digress a bit, I've finally purchased the kitchen aid that I've been dreaming. It's going at $741 now during the Great Singapore Sale at Mayer Marketing, with complimentary $50 voucher, to be used within three months without any minimu purchase. I'm not sure if this is the best deal that I can get though. Check it out at Mayer if you are interested now. :)


The contractor told me he had never done a pink glass backing before. So, it's like a risk we are taking. I'm not that adventurous yet, so I've asked my contractor to get a sample of the glass backing to have a look before deciding. Hopefully it turns out pretty. Otherwise, I'll likely go for the safer colour -- white. :P

This cake was made the day after I attended the cartoon cake workshop at Sugar Inc. I thought it's a good chance to put to good use what I attended the day earlier since it was still fresh in my memory. Why not a cartoon cake? You might be wondering. Well, somehow the chocolate could not harden and the cartoon-design chocolate transfer was a disaster. I wonder why. Till now, I am still confused over the use of the types of chocolate to be used in baking. Conveture chocolate, it seems, is not good for piping as they don't dry out that easily. Anyone can advise?


I had to make do with a simple frosted cake with simple wordings. The coating was still not to my expectation. But I'm happy that I succeeded in the making of italian meringue buttercream. It was smooth, creamy and stable, best if it needs to withstand for hours in room temperature if I'm making for my friends. :)


Practice makes perfect in perfecting a technique but I wonder when will be my next frosted buttercream cake. *lol*. Hopefully in my new kitchen soon :P

June 14, 2011

Cartoon Cake Workshop

These pictures had been sitting in my edited post for more than a week.... and another 2 days of re-uploading before it finally made its way here.


I attended a cartoon cake workshop a few months back at Sugar Inc with Anna Chan. It was a weekday afternoon and I took half a day's leave just for the workshop, as a treat for me to have a break from my hectic work. Located at the ground floor of a shop unit at Jln Bukit Ho Swee (near iong Bahru MRT station), this small little unit offered more than what it seems to be able to deliver. It is fully equipped with the essential equipment and cookware, that makes my heart beat (excited) as I entered the worksop, knowing I'll be in for a learning session!


The class is limited to 8 in a class so that Anna can gave more attention to each student.


She first did a demo on the sponge cake.


followed by the frosting...


A demo showing how to make Italian meringue buttercream. This was one of my reason for attending the class.


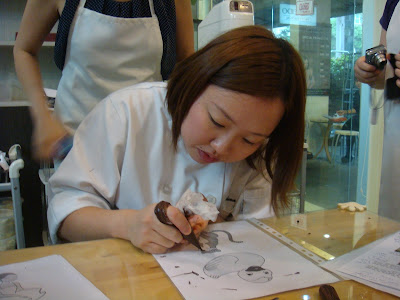
That's Anna, showing us how to do the outline. Melting the chocolate for the outline of the cartoons (using melted chocolate to draw the picture)
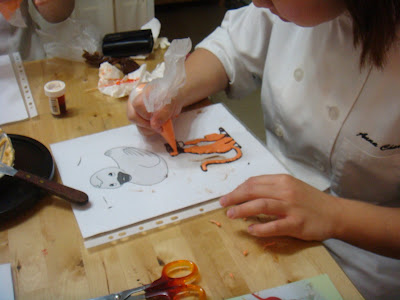
And colouring the cartoon picture with melted white chocolate tinted with food colouring.


The frosting was the most difficult part of the hands-on session. No matter how many layers I frosted, I still could not get a smooth, evenly layered frosted cake. I always tend to leave some cake crumbs behind... >_<


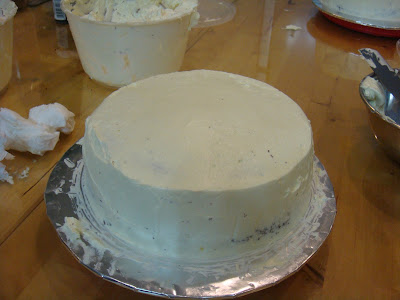
That's Anna's work! See how smooth is her frosting.


Other classmate's works. :)
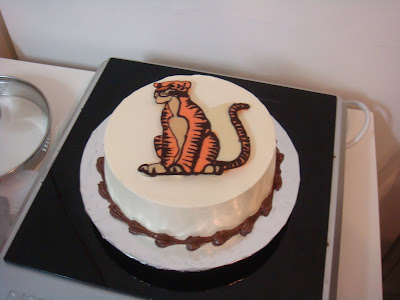
And mine! :) To be honest, I thought that the technique and concept of the transfer chocolate method is rather simple. It involves the drawing of the design you like with dark melted chocolate, and "colouring" with tinted melted white chocolate. Let it set in the fridge and transfer to the cake. I thought I could apply the same method if I use gel for the filling but according to Anna, it is different. :(


But of course, there are still certain techniques that you may not know without learning hands-on, such as having to fill in the white chocolate in the outline fully without any gaps so that there will be no breaks when it hardens.


Overall, it's a fruitful session and immediately the following day, I made a buttercream cake for my best friend, by trying to apply when I've learnt. (sans the cartoon!). Will show it in my next post.