November 30, 2007

A day of bentos and tartlets

A lovely Saturday morning, lovely weather, off we girls went to the....ZOO! LOL yeah you are not seeing wrongly. We 4 'big' girls actually went to the zoo. Somehow got this idea from so and so..(I forgot whose friend), and decided to head outdoors. Yeah! I love outdoors..what i'm only worried about is the effect on my skin colour...No wonder people are saying I'm getting more and more tanned..:(


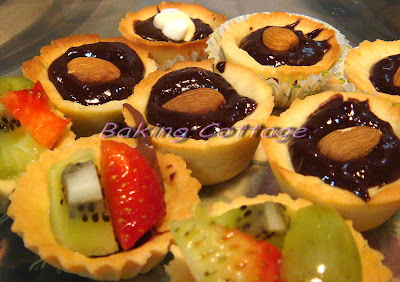
See the super thick crust??


As usual, the task of preparing for the day's picnic food would have to leave it to me and xian. We were already happily shopping for cute bento boxes, cutters etc at Daiso the week before. Knowing that xian would definitely be preparing quite an amount of food for the bento, so I baked some mini tartlets...
I find myself often being too ambitious. I would often be brainstorming in my head ...hmmm what am I going to bake, the different variations, favours, colours etc in order to try out everything. More often than not, it was not possible, of cos' unless I don't need to sleep. I'm a late night owl..hehe like to do my things at night..cos' in the daytime, would either be out or working. Just like this tart venture, had planned to make fruits, cheese, chocolate, apple crumble tartlets. In the end, I gave up on cheese and apple crumble as I thought it would be too much of a hassle to have to beat cream cheese; and that apple crumble only taste nice when it's piping hot. Lucky I was realistic enough. Haha...I was right; cos' after making chocolate and fruit tarts; I was already exhausted; it was already late at night. I had planned to bake this the night before so that I can chilled it for next morning.

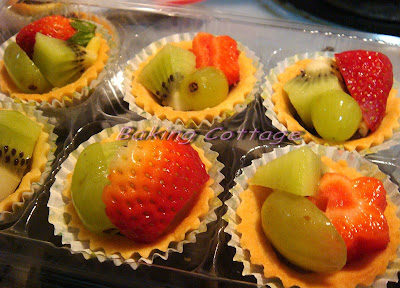
For the tart shell, I used the recipe from Aunty Yochana's blueberry cheese tart. I had much difficulty pressing into these mini tarts shells, especially the mini muffin tray as I did not have enough mini shells. I made a total of 24, but i guess I could make much more cos' you see, my shell was so thick! For the custard and glazing, I used the recipe from Jodelibakery - go to fruit tarts. However, I wasn't too fond of such custard. I would probably use another type made from milk, egg yolks and cream next time.

Ingredient for tart shell:

100 g butter, softened
60 g icing sugar
30 g beaten egg
200 g plain flour
1/8 tsp salt
1/2 tsp vanilla essence

Method:

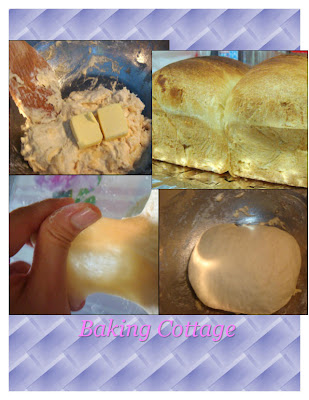
Cream butter and sugar until soft
Add in beaten egg, salt and vanilla
Fold in flour and mix until a dough is formed
Chill the dough in the fridge for at least at least 30 minutes.
Roll the dough onto a work surface - about 3 to 4 mm thick. Use a round cutter and cut into rounds. Press in into the tart shell. Trim the edges
Poke the tart shell with a fock evenly.
Bake in preheated oven at 180°C for 10 to 15 minutes or until golden brown.
Leave it to cool.

Method for custard:

Pour 250 ml of milk into a saucepan.
Dissolve 30 g of custard powder and keep stirring until no lumps are found.
Add 35 sugar and cook over slow heat. Keep stirring until soft lumps are formed. Let it cook.

(Note: I chilled it in the fridge as what the recipe says and ended up having thick solidfied custard which could not be piped onto the shell. So I would recommend not to chill it).

Method for glazing (optional):

Dissolve 1 1/2 tsp of instant jelly into 80 g of water. Bring to a boil. Let it cool a little and used it to glaze the tarts after fruits are added.

To assemble, after the tarts are cooled, pour cooled custard into the shell, add fruits as desired and glaze with glazing shell. I added some nutella into the shell before the custard. :)

Ok, now I'll introduce the chocolate ganache tartlet. I modified the chocolate ganache from my previous chocolate truffle recipe.


Ingredients:

20 g of conveture milk chocolate
30g of dark chocolate (72% cocoa) - If you prefer sweet chocolate, may use all milk chocolate cos' dark chocolate gives a bitter taste
50ml of whipping cream
10g of almond meal (Optional)

Whole almonds

Method:

Melt chocolate over double boiler and set aside.
Heat cream till simmer.Stir cream into melted chocolate and stir in widening concentric circles.
Add almond meal and stir gently.

Scoop into the tart shell, decorate with an almond on top. dada...finish!

Okok let's see what xian have in store for us.....

Fruits Bento...........

Potato Salad....

Colourful Bento...consisting of egg mayo /luncheon meat sandwich, taiwan sausage, meat /sotong balls, crab meat, cucumber, carrots and chicken nuggets.

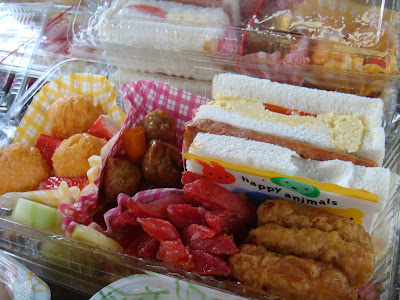
I tried asking xian for the recipe ...Haha according to her, most of them were based on 'instinct'. Just fried the ready-made food, boil and potatoes and eggs and add mayo / bacon bits accordingly. "colour combi is impt in bento-making.. cos makes the bento very appealing!.. the food arrangement...must think and plan...use cute cutters for carrot, cute mini food cups (refer to the red and yellow paper cups) and cute food divider (refer to 'happy animals')..." Quoted by Kexian...LOL!
Well..anyway I think we were not so interested in the animals, :P rather we were more interested in eating, chatting, taking photos....relaxing outdoors.


I guess age is catching up on us..hee..felt tired after a whole day's walk. But the movie 'Enchanted" wake us up! It's so funny and sweet...definitely a must watch movie....

And this is my favourite animal for the day..They would turn to the same direction all at the same instant the moment wherever there's food..So CUTE!

November 26, 2007

Double Soft Bread

Attracted by the title? Yeah, true to its name, this bread is really soft and fluffy. I felt it was even better than the Hokkaido milk loaf, but do not buy my words cos' this time round, I did a better job in my kneading. I finally passed the window pane test! Yeah...and I took a shorter time this time, 20 minutes. Not bad...Ha..tried to use more force, and also went through some kneading videos; and not forgetting the hiccups I encountered when I baked the Hokkaido loaf the last time, which could have contributed to a less than satisfactory result.


I was actually looking for ways to use up the whipping cream. I had planned to bake the hokkaido milk loaf when I came across this recipe from this chinese blog - Warm Sweet Home. This bread uses whipping cream as well, and some butter. The origin of this recipe was from a japanese website I think. I find that breads that uses whipping cream often churn out doubly soft bread that remains as soft the next day. :)

See the texture? It's so soft and cottony. I baked it in a 8-inch by 4-inch loaf pan. As what I did previously, I rolled into 2 logs and put into the loaf pan for proofing. The space was rather constrained for the dough to expand. Seemed like two pieces of fat bulging out LOL. Time for me to get a pullman loaf tin. *hint hint to anyone out there..christmas coming.. :P*


I did not make much changes to the original recipe except for a few grams difference in some ingredients.

Ingredients:

Bread flour 320 g
Dry yeast 3 g
Egg 38 g
Salt 4 g
Water 160 g
Whipping cream 35 g
Honey 33 g
Butter 16 g

Method:

  1. Mix all ingredients together except for butter (I usually separate the yeast from salt as I've read that direct contact with salt would kill the yeast).
  2. Add butter and knead into the dough until the dough becomes smooth, no longer sticks to your hands and is elastic and able to form a thin film which does not tear when stretched (window-pane test).
  3. Shape into a round and let it proof until double in size, about 60 minutes.
  4. Punch out the air, divide into 3 portions (I divided into 2) and let rest for 15 minutes.
  5. Roll the doughs into a swiss-roll style and place them in the tin. (Be sure to measure out the length that you want to fit in). Let it proof until reaches 90% of the tin. (Does not apply to me cos' I didnt have a pullman tin. But I took about 90 minutes).
  6. Bake in preheated oven at 200°C for 10 minutes; then reduce the temperature to 175 °C and bake for another 25 minutes.
  7. Remove the bread and let it cool completely before slicing.
Recipe Source: Warm Sweet Home

This recipe is definitely a keeper. Do give it a try! :)

November 20, 2007

Pretty pretty desserts for you...

My friend was asking me how come I did not bake anything recently..Heh actually I did bake some cookies last week...but will be posting it later with another batch of cookies that I intend to make.

Meanwhile, thought I'd probably post some eye candy pictures of yummy pretty desserts I've had recently. :)

Waffles @ Bakerzin


Strawberry Shortcake & New York Cheesecake@ one of a dessert cafe at Clarke Quay


Yummy2! Alrightz that's all for you to drool at at the moment. When post some more pictures when I have any desserts again... ;)

November 16, 2007

Cream Scones for breakfast!

Yeah...yeah...finally something different for breakfast. Getting quite bored of muffins, breads, cereals, oats ...etc for my breakfast. Been thinking of what can I bake without making a mess of the kitchen and getting scolded by mum; without having to wash so much and making myself so tired after a day's work, and still fulfilling my baking itch and next morning's energy booster...


Flipping through my recipes, yeah scones it shall be. Realised I've not been baking it for a long time since the last (and first) time I baked it. So this was my second time. I found one recipe that uses whipping cream. Just nice cos' I'm still left with some whipping cream which I had been hoping to finish it up. The recipe, from Williams Sonoma-Essentials of Baking, wrote that "these cream scones-rich british tea biscuits, with slightly cake-like texture, have to be worked quickly, using a very light touch and put into the oven immediately after cutting in order to produce tender scones." Heh however I did not fulfill that, my hand movements still rather clumsy. Luckily it turned out fine. :) These are sinfully rich scones, where butter is rubbed or cut in, mixed with heavy whipping cream and often brushed with cream and sprinkled with sugar.


I was quite happy that the result looked similar to the picture posted. :) And they were really nice..flaky texture, buttery taste but quite rich though; not something I would usually have for breakfast. The orginal recipe uses currants but I used chocolate chips. I made another version plain, and sprinkled with cinnamon sugar. Both has its own unique taste, yummy! Can't tell which I prefer. :)


I eat it with some strawberry jam. Doesn't the one on the left look like strawberry shortcakes?? ;)

Ingredients:

For the dough

2 cups (10 oz/315 g) plain flour
1/4 cup (2 oz/60 g) granulated sugar
1 tbsp baking powder
1/2 tsp salt
2 tsp grated lemon zest (i omitted it)
6 tbsp (3 oz/90 g) cold unslated butter, cut into 1/2-inch (12-mm) pieces
1/2 cup (3 oz/90 g) dried currants (I used chocolate chips)
3/4 cup (6 fl oz/180 ml) heavy cream

For the topping

1 tbsp granulated, demerara, or turbinado sugar
1 tsp ground cinnamon
2 tsp whole milk or heavy cream


Method:
  1. Position a rack in the middle of the oven, and preheat to 425°F (220°C). Line a half-sheet pan or rimless baking sheet with parchment (baking paper).
  2. In a bowl, stir together the flour, granulated sugar, abking powder, salt, and lemon zest. Using a pastry blender or 2 knives, vut in the butter until the mixture forms large, coarse crumbs the size of small peas. (I used rubbing-in method--rub with finger tips, pinch some flour with the butter and keep rubbing in, lifting the flour high each time and continue until all the butter are rubbed in, forming coarse crumbs) This was the first method I learnt in baking during my secondary days home economics lesson!
  3. Stir in the currants. Pour the cream over the dry ingredients and mix with a fork or rubber spatula just until the dry ingredients are moistened.
  4. Turn the dough out onto a lightly floured work surface and press together gently until the dough clings together in a ball.
  5. Pat out into a round about 1.2 inch (12 mm) thick and 6 1/2 inches (16.5 cm) in diameter. Cut the round into 6 wedges, or use a 3-inch (7.5-cm) biscuit cutter to cut out rounds. Place them one inch apart on the prepared pan.
  6. In a small bowl, stir together the sugar and cinnamon. Brush the wedges / rounds with milk and sprinkle evenly with cinnamon sugar.
  7. Bake until golden brown, 13-17 minutes. Transfer to a wire rack to cool slighly. Serve warm. Can be stored in airtight container at room temperature for up to 2 days.

November 12, 2007

Jam-filled Sponge Cake

I had to modify the name...initially the title of this post was supposed to be jam-filled swiss roll, if only I had made it successfully. But I didn't manage to roll it nicely and it cracked. :( So I had to turn it into slices of cake sandwiched with strawberry jam.
The cake was really yummy, soft and spongy. Recipe from Aunty Yochana's sugar roll. I guess besides the lack of technique of rolling, the top part of the sponge sheet was abit burnt, thus it cracked easily when I was trying to roll it. Found that my oven was rather hot. Really got to undestand my oven well before venturing into my bakes next time.


Packed a slice of it for my nephew. :)


Hmmm...what shall I bake next??


November 10, 2007

Muffins Craze...


I had been baking muffins recently. Not that I like to eat muffins alot but cos' I find muffins cute, convenient and much simpler where I can spare the time and energy to bake during weekdays when the itch to bake sets in... ;)

Now that christmas is coming, I'm planning to bake cookies and cakes to give away! Somehow ever since I started baking, whenever I see bakeries selling cookies and cakes, and if knowing I know how to make myself, I can't help wanting to go back home and try myself instead of buying it. This christmas, I'm thinking of trying more colourful decorations for the cookies, if time allows. Hopefully I can get more creative than previous years, and produce nicer, more tasty treats. :)

Here are some of the muffins I baked.

This is a simple mixed-in muffin with carrot and orange juice. The recipe was obtained from the same book mentioned in the previous post - Cakes and bakes by Hamlyn. The result was not what I expected. The taste was not bad, but I find the muffin too moist. I'm not sure if it was due to me shredding the carrot instead of grating it, thus it produces alot of water. When the muffin was baked, I could not see any carrots, but orange rind only. I think I should have added more flour, or more oil instead of liquid ingredients. Anyway this is a good combination to consider for a healthy muffin and i would probably add in carrots to another orange muffin recipe which I'm going to introduce below.

Noticed some brown spots on top? Those were white chocolate chips. Sprinkled onto some of them but taste wasn't prominent. This is a good and yummy recipe from Florence's blog after having tried different recipes before. This time, I made quite a few modifications to the original recipe. I halved the recipe, used canola oil only instead of half oil and half butter, reduced the amount of oil as I felt that the one I made the last time was too moist and oily, as I personally prefer not too moist muffins. Just cutting a bit of oil works just as fine. I also omited the chocolate swirl as i was lazy to wash extra bowls. Wanted to make it as simple as possible. :P

I'm able to make 12 mini muffins and 4 heart-shaped cakes from the heart-shape mould. The 12 minis were for my mum to bring to her tea break with her friends. :) I told her that the heart-shape muffins was for her afternoon Sunday tea accompanied with the rose buds for her to brew some rose tea. But she didnt drink that though. :P


Ingredients:

  • 3/4 cups plain flour
  • 1 tsp baking powder
  • 45 g sugar
  • 1/8 tsp salt
  • 1 small egg
  • 62.5 ml orange juice }
  • 62.5 ml buttermilk } Just a guage, not very accurate though
  • 40 ml canola oil
  • tsp vanilla essence
  • grated orange zest of half orange
Method:

  1. Preheat oven to 190 degree celsius.
  2. Sift together flour, sugar, baking powder and salt.
  3. n a separate mixing bowl, whisk together egg, buttermilk, orange juice, oil, vanilla essence and orange zest.
  4. Pour the egg mixture into the bowl of dry ingredient. using a wooden spoon, stir them gently until well combined, forming a uniformly moist batter. Do not over-stir.
  5. Fill each muffin cup to 80% full.
  6. Bake in the oven for 10 minutes, then rotate the pan for more uniform baking. Then bake for another 5 to 10 minutes or until a tester inserted comes out clean. (Note: my baking time is shorter as I used mini muffin pan. For regular muffin pan, bake for 12 minutes, rotate, then bake for about another 10 to 15 minutes)
Adapted and modified from: Do What I Like

Can yield about 14 mini muffins or 6 regular muffins.

Ok this is the last muffin I made.
This was made before the mini orange. Saw this cute little pandan chiffon from one of a chinese blog, with lots of nice bakes. However for this muffin, I find the taste ok only, cos' it used pandan paste only. It would be better if pandan juice or coconut milk was added. And I guess too much of the pandan paste was added so made the colour looked artificial. But I like the cute dome shape! :)

November 6, 2007

Banana Streusel Cake

I just borrowed this book from the library - Cakes and bakes by Hamlyn with various types of recipes of homemade bakes. Was attracted by this Cherry streusel cake in the form of bars topped with cherries and almonds. The recipe uses canned cherries. I have instead some ripe bananas and so decided to use bananas as toppings.
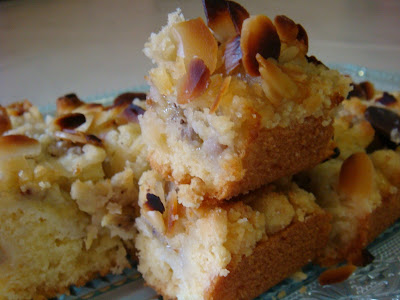
The result was good, with a thin layer of crusty cake base, topped with bananas, crumb toppings and lots of toasted almonds. it can be cut into 16 squares, so each mini bite is buttery and flavoursome. Something different!

Ingredients:

  • 175 g self-raising flour
  • 100 g unsalted butter, diced
  • 75 g caster sugar
  • 50 g ground almonds
  • 1 egg, beaten
  • 2 tablespoons milk
  • 1/2 teaspoon vanilla essence (orginal recipe uses almond)
  • 4 large bananas (original recipes uses 425 g can stoned black cherries, drained)
  • 25 g flaked almonds

Method:

  1. Sift the flour into a bowl, add the butter and rub it in with your fingertips until the mixture resembles breadcrumbs. Add the sugar and ground almonds and stir with a wooden spoon to mix. Measure out 75 g of the crumb mixture and set aside for the topping.
  2. Add the egg, milk and essence to the rest of the mixture and mix together until smooth.
  3. Lightly oil and line a shallow, 8 inch square (I use 7 inch) baking tin. Spoon the mixture into the tin and smooth flat. Sliced the bananas thinly and placed on top of the mixture and sprinkle the reserved crumbs. Sprinkle the flaked almonds on top. (if using cherries, just spoon the cherries instead of bananas on top of the cake mixture).
  4. Bake in a preheated oven, 180 degree celsius for 25-30 minutes, or until it is well risen and the topping is pale golden. leave the cake to cool in the tin. remove from the tin, peel away the paper and cut into 16 squares. cake may be stored in an airtight container for up to 2 days.

November 5, 2007

Steamed 9-layer kueh and spinach stir-fry

I made this steamed 9-layer kueh the day after I made the pandan chiffon with the leftover coconut milk but had been too busy to post. I thought I had all the ingredients on hand, so it would be great to utilise the remaining packets of tapioca flour, glutinous rice flour which I had left from previous festive bakings.


Only as I was reading from the recipe and measuring out the ingredients, I realised that what was needed was rice flour and not glutinous rice flour! Actually I was not sure of the difference between the 2 types of flour. I even went to make a search to make sure they were different. Oh well, since the rest of the ingredients were out already and would have gone to a waste, I might as well tweaked the recipe a little bit to see if it works. So, I increased the amount of tapioca flour and replaced some rice flour with plain flour (which I saw was used in some kueh recipes).


There I began..steaming layer by layer...These were the only colours I have :) It was a very relaxing task, not much strength needed unlike beating or creaming or the heat from the oven.


Surprisingly I was able to get a quite decent-looking 9-layer kueh. :) :) Taste wise, I felt it could be sweeter, I would not reduce the sugar in future and would probably follow the amount as indicated in the recipe. Only downside was it was rather tough, and chewy...which was expected as I did not follow the recipe at all! My mum still liked it.. haha, she's too easy-going. Anyway I got the recipe from Florence's blog - Do what I like.


By the way, there's this kind of kueh sold in Bengawan Solo, a small piece of brown kueh (don't know what it is called) which I think was made from brown sugar and probably coconut? Does anyway have the recipe for that? My mum loves those and would be great if I can try that ;)

It was a lazy Sunday for me that week. Didn't go out after an outdoor activity the previous day. So I offered to help my mum cook some dishes, with a little supervision from her..haha..have not cooked for quite some time. Here's my piece of work : Spinach stir-fried with canned mushrooms. Was quite pleased with the results. :)


Hopefully I will have the chance (provided I'm not going out or lazy :P) to cook more in future.