April 28, 2008

Wonders of Yogurt

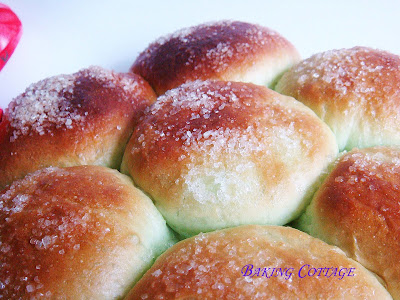
Ever since I started baking, yogurt became an essential pantry item which I'd often stock up not only for the purpose of eating but for baking as well. Yogurt creates wonderful moist texture in many cakes and quick breads which also substitutes well for other dairy products such as milk, buttermilk, sour cream. Little did I know it works wonder in bread as well. :D

The success of this yoghurt bread by Happy Homebaker, Sweet-tooth and KWF tempted me to HAVE to try out this recipe. Definitely no regrets as this bread has a fluffy, fine texture that remains soft after a few days. What's more, it encountered some 'mishap' yet I was surprised the end results was still so good.

LOL...this is what happened. AFter the final proofing, the bread had rose beautifully to about 4/5 of the pull-man tin. I thought of not covering it with a lid in order to get a loaf with the semi-circle top instead of a square loaf. After putting into the oven, I found the tin seemed too tall with the top too near the heating element. So, I thought I had better cover it as I was afraid the top would get burnt. So, I quickly took it out; with a slip of my hand, the entire tin bang onto the table top and in an instance, I saw the proofed dough started shrinking..! Without hesitation, I just quickly put it back into the oven. I almost cried...haha...cos I was so so sad that all my hours spent would be gone to waste.

To my delight, the bread still turned out fine, though it would have been much higher.

I used raspberry yogurt and the bread had that subtle sweet berries fragance. This recipe is indeed foolproof, definitely a to-keep recipe! But pls pls...don't ever be like me! :P


April 20, 2008

Oh So Kawaii!

Recently, many people around are going to Japan for tour. Well...guess this is the time cos' the Sakuras are blooming at this time of the year! Oh..how i wish I 'm going too...hehe...Anyway, my brother just returned from Japan not long ago and I've requested that should he wanna get anything for me, look out for those cute bakewares! Thankfully he got those for me! Here's a glimpse of some of the things he brought back...
These are some of the cookie cutters, muffin liners and other bento stuffs that we often see in Daiso. In Japan, Daiso is also a very popular store and according to my brother, these items, after converted to Sing dollars cost only about S$1.60! That's incredibly affordable especially for the Japanese where their cost of living is so high.

Here's a lunch box he got for me from Japan. This is more costly...but it'ss worth the money (hehe...of course, I'm not the one paying :P). I used to bring bentos to work almost everyday, but nowadays, mch lesser after I changed my job as there's so many good food around. But guess I will be starting to bring my own lunch one or two times a week. :)

I like that this has many "compartments", for sushi, rice balls and small portions of food. :) Kawaii (meaning cute) right?? But hope the Winne the Pooh doesn't make me seem too childish. :P

April 19, 2008

Sesame Bagels

Baked these bagels some time back. I actually only got to know about bagels after I starting baking. Baking has widen my knowledge on the different types of bakery and pastries all over the world. For some history on bagels, you may refer to here.

My first bagel was at starbucks. It was a rather plain kind of bread, best toasted with jams. Since I like toast, and it's a healthy bread, I find it worthwhile to give it a try! Yeap, I'm keen to try more kinds of bread. It's always nice to make your own breakfast from scratch. :)

Making of bagels involves a different step. The dough, after the second proofing, is boiled in the water before sending to the oven for baking. As such, you gotto be very careful not to deflate the nicely proofen dough. I did exactly just that. So, you can see that my bagel (first photo) is badly wrinkled. :( I guess you need to be gentle as well as skilful in handling the proofed dough. Out of the six bagels I shaped, three of them were destroyed by me! Thus for the remaining ones, I decided not to boil them, but just bake them as proofed in the oven.

Hehe...see below...at least it looked better right??
The interior was moderately dense and chewy, with a crispy exterior. The one which had been boiled was more chewy but too dense as they had been deflated. Overall, I found it ok, but definitely not as tasty as those sweet buns we have. :)


If you are interested, you may give it a try. :)

Ingredients:

  • 250 g bread flour
  • 10 g caster sugar
  • 1 tap salt
  • 2.5 g instant yeast
  • 190 g water

Water for boiling

  • 25 g caster sugar
  • 500 g water

Method:

  1. Lined a greased tray with parchment paper.
  2. Mix all ingredients together to form a dough. (Separate the salt from the yeast)
  3. Knead the dough until it pulls away from the sides of the bowl; becomes smooth, shiny and elastic (You may use a mixer or a bread machine to knead the dough).
  4. Form dough into a loose round ball and let it proof until bouble in size, about 50 minutes.
  5. Punch out the gas, and divide into 6 portions of about 60-80g each.
  6. Form each portion into round ball and let it rest for 10 minutes.
  7. Flatten the dough, roll into a long strip (like a rope), and seal the ends to form a ring, with a hole at the centre (make sure the hole is big enough to allow room for it to expand during proofing).
  8. Repeat the same for all the remaining portions. Let proof for another 30 minutes.
  9. Boil the water with sugar; lower the proofed dough into the boiling water, and simmer for 1 minute on each side. Transfer onto the prepared tray.
  10. Brush bagels with egg wash and sprinkle with sesame seeds.
  11. Bake the boiled bagels in a preheated oven at 170C for about 20 minutes.

Recipe Source: 面包,吐司,饼干 by 杜丽娟,李湘庭

April 10, 2008

Two Brownie Recipes in Two days..

I love brownies! To know me better, know me as a gal whose favourite desserts is warm brownie top with ice-cream. :P I simply adore baked warm desserts top wth ice-cream, such as waffles, apple crumble...etc. But brownies would be my favourite. Just that I may need to go running the next day after indulging in it. LOL :D


We had our girly gathering last week at Kexian's house...I promised to bake some brownies for them, which they recalled was one of my 'specialty'...I had tried a few brownie recipes in the past, most of them were pretty good. I decided to try out this perfect fudgy brownies from Nic - Bakingbites which I had been wanting to try out for a long time.

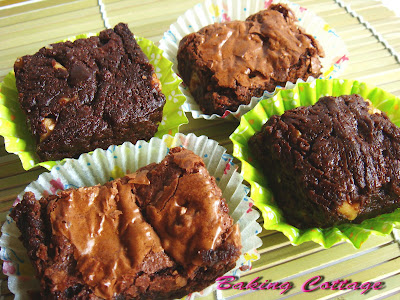
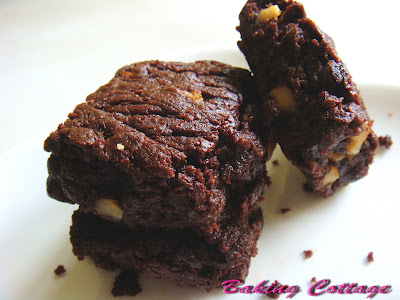
In this recipe, Nic introduces a special technique that would deliver something which is what I'd like in a brownie...fudgy, chocolately, not cakey, with a good crust. The special method involves baking the brownies at a high temperature for about 20 minutes, then dunking the pan in an ice bath. This recipe originated from Alice Medrich's Cookies and Brownie, whom through many floggers, that her chocolate recipes are good. Forget about the fat and calories, I knew I had to try it! For detailed explanation of the methods, do visit her blog. :)

The result? It was truly chocolatety and dense. I brought over to Xian's house. She had it warmed and we had it with raspberry ice-cream! However, they felt that it was a tad too soft. It kinda crumbled easily. They commented that my previous brownie seemed to be better. My previous recipe actually came from Happy HomeBaker's Nut and Chocolate Chip Brownies.

Since I had decided to give the remaining brownies to my colleagues and there wasn't enough, I decided to bake another batch using Happy Homebaker's recipe again so that I can have a direct side to side comparison! So here I am, with another batch of bronwies the next day.

Notice the difference in colour tone? The lighter brown colour, with shiny flaky crust is the recipe from Happy Homebaker's. Very easy to identify the difference right? :) I'm sure you would like to know my verdict after testing out these two recipes. Ok, here's my comparison. ;)


Perfect Fudgy Brownies

  • Uses Butter
  • Without choco chips
  • Rough, dry top
  • more chocolatety & buttery
  • Sweeter
  • Denser, shorter
  • Granulated sugar

Nut & Choco Chip Brownie

  • Uses Oil (healthier)
  • Addition of choco chips
  • Shiny, flaky top
  • Less chocolatety, milder flavour
  • Less sweet
  • Puffed up more - higher
  • Brown sugar

Personally, for me and my permanent gourment taster who has a sweeter tooth, and really likes chocolates, would prefer the darker one, i.e. the perfect fudgy brownie. However, I do find it on the oily side when warmed. It's best to refrigerate it least for a few hours. My mum and one colloague who preferred not too sweet stuffs actually preferred the other one.

I would say both are really good brownie recipes. They are definitely not the cakey type. I brought it to my colleagues and be it either one of them, they said it was nice nice! :D

So which one would you prefer?? ;)

April 8, 2008

Simple Pandan Buns

Breads again?? Hehe yeah...sorry to those who may get bored of seeing only bread post recently ..but I couldn't help it...been in this bread baking craze lately. But don't worry, you'll see something else soon. In fact I've been baking alot, but missed blogging cos' I'd just formatted my pc and couldn't find suitable photo viewing/editing software for my pictures. Any recommendations??

Anyway, I made these pandan buns a few weeks back. They were simple plain sweet buns but I added some pandan paste to make it into pandan buns.

I used the sweet bun recipe from Amanda's blog after her reviews on how soft the bread is. True enough, the bread when just baked, was so soft that as what she described, I feared de-shaping my soft soft buns! :D The slight tinge of pandan flavour with sugar toppings rekindle my childhood days where my mum used to buy pandan breads sandwiched with cream. Yum2!

Ingredients:

  • 240g bread flour
  • 60g plain flour
  • 50g castor sugar
  • 10g milk powder
  • 2 tsp instant yeast
  • 1/2 tsp pandan paste
  • 1 egg
  • 150g Milk
  • 20g unsalted butter
  • 5 g salt
  • Coarse sugar for sprinkling on top

Method:

  1. Mix flour, castor sugar, milk powder and yeast till well blended.
  2. Add milk, pandan paste and egg to form a dough.
  3. Add in butter and salt and knead until dough is elastic and smooth.
  4. Gather dough to form a ball and cover dough with cling wrap and let it rest for abt 50-60 mins or double in size.
  5. Divide dough into portions of 60 gm each. Shape into balls and leave it to rest for abt 10 mins. Roll out dough and shape as desired/wrap it with fillings.
  6. Let it proof on lined or greased baking tray for another 50-60 mins or until dough is double in size.
    Apply egg wash (1 beaten egg) or milk on dough and sprinkle toppings as desired on it.
  7. Bake dough at 180-190ºC for abt 12 mins or till lightly brown.

This recipe makes 7 round buns and one small loaf.

Note: I used the bread machine to knead the dough. I do not know what should be the sequence but usually I would start with the liquid ingredients (milk, water), followed by the dry ingredients (e.g. milk powder, sugar), flour and lastly the yeast. I always make sure salt and yeast do not mix.

Recipe Source: Amanda - Held by Love


On the day it was baked, the buns were really soft and fluffy. It started to harden abit the following day. Nevertheless, I love it!! :)