November 30, 2008

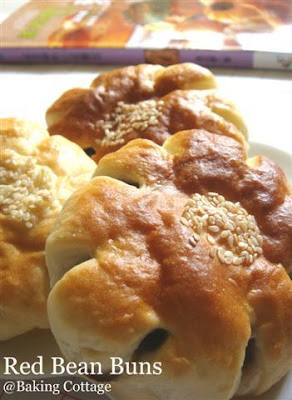
Red Bean Buns


I have not been making sweet buns for quite some time and was happy that I made it last week! This red bean bun (Anpan) may not be unfamiliar to some of you because Small Small Baker, MH from My Home Kitchen and Happy Mrs Kwok had attempted it before. Recipe comes from the same book “孟老师的一百道面包”. Most of the recipes in the book are easy to follow and yield just suitable proportion for Home Bakers. :)

I didn't know that to achieve this shape is so simple just by making eight slits around a normal round shape bun!

For this recipe, the final proofing after making the slits is only 10 minutes. I was actually wondering if the bread could be fluffier if I had proofed it longer? If I make this again, I'll try proofing it for a longer time during the final proofing to see if the result differs. :)

Recipe can be found at My Home Kitchen and Happy Mrs Kwok.


November 24, 2008

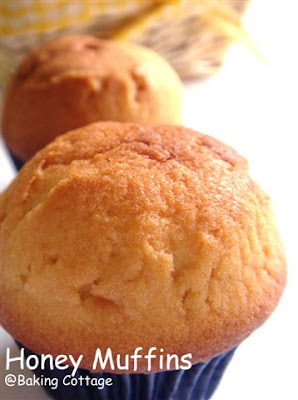
Honey Muffins


Yet another basic muffin recipe again. A plain muffin, nothing spectular, but I was really elated when I saw it puffing so high in the oven as the usual smell of baked muffins filled the entire kitchen on a weekday night. If I happened to miss my baking sessions that weekend, I'll satisfy that urge and bake something during a weekday night, more of enjoying the process rather than eating the muffin. :P
This was in fact my very first muffin, yeah and a very successful muffin despite I'm using the old, small oven back then. This recipe was shared by a university friend of mine, who told me that baking was not difficult as she graciously passed this recipe to me, telling me that it's a simple and good recipe and I'll definitely gain more confidence after I succeeded. True enough, the muffin turned out so well that it ignited my passion for baking and probably that's how I continue thereafter... baking whenever I have the time to spare, and even more crazy now that I no longer have to face exams, tutorials, tests, etc and can better plan my time.
Once in a while, I still come back to this recipe whenever I have the ingredients but somehow it doesn't turned out as good as it was and this had been puzzling me until this time round, I think I finally got the answer. As this recipe called for self-raising flour, which I don't often stock up, I tend to replace it with plain flour + baking powder (as a substitution). Although the result was okay, I mean still edible of course but somwhow it was dense and just not right. It did crossed my mind that the flour could be the culprit. So I need to try it out to confirm. I guess I'm right, cos' this time round, I faithfully followed the recipe using self-raising flour and yeah! I got it! The muffin was soft and fluffy, and the sweetness that comes from honey always makes me love it more. My dd's mum commented it's a little dry, though I felt it was okay. Hmmm, well probably adding a little more butter helps?
I baked in mini muffin pans and yielded 16 minis using only half recipe. I deliberately filled the muffin cups with batter right up to the top to achiev a very big dome like a mushroom! I think it looks pretty don't you think so?? :P
Honey Muffins (This is the original recipe, should yield 12 standard size or 32 minis with big mushrom head!)
Ingredients:
300g self-raising flour
150g castor sugar (I reduced to 120g)
15g milk powder
120g butter
30g honey
90g eggs
165g water
3g Vanilla essence
90g Blueberry (optional)
Method:
  1. Preheat oven to 180°C.
  2. Cream butter, sugar, milk powder and honey until light.
  3. Add eggs in stages.
  4. Sift in the Self-raising flour and add alternately with the water to the batter.
  5. Blend in the blueberries and vanilla essence.
  6. Bake for 20-25 minutes (I used 15 minutes for mini muffins) or until done.

November 20, 2008

Two "Yammy" dishes

Have I ever mentioned before, that I love eating yam. I love the taste, and the texture that's similar to sweet potatoes, potatoes, chestnuts, etc.

Yam desserts such as Orh Nee (a chinese dessert where yam is mashed and cooked into puree, usually with pumpkin and ginko nuts) or yam fritters are usually too sweet for my liking even though I like it. I love yam rice or some very good yam cakes where I can bite into chunky bits of yam. However my mum never cook yam at all cos' she says it is not easy to clean and peel it.

Recently I bought this food magazine 'Food & Travel . Kitchen Culture' from the supermart. This magazine has quite an extensive number of articles on cooking tips, recipes, food reviews and travel articles of personal accounts from travel writers revolving around food and culture. It's quite interesting. I just bought another issue of it yesterday and shall see if this is worth my monthly read. ;) Heh ok what I wanna mention about is this fried yam rice in the magazine.

I bought a packet of pre-packed yam which had been peeled and washed. Great! Heh, good for lazy people like me. I did'nt know things are so convenient now. :D On that very day itself, I made this steam yam cake, for my mum to bring to her karaoke sessions with my aunties (hoping it'll be successful) and my myself and dd to try. I followed Happy Mrs Kwok's recipe. However, for the seasonings, she only mentioned "as desired" and I'm poor at gauging how much I should use as I don't cook often. So the yam cake turned out too bland! Heh... luckily with some sesame oil, sesame seeds and soya sauce, it was still edible. Haha! My mum said my aunties were hungry so it was still well received. LOL!

Do note that you've really got to wait till it's completely cooled before slicing as it was very soft and mashy immediately after steamed. I did not pan fry it, too much of a hassle for me, but I believe it would taste much better.
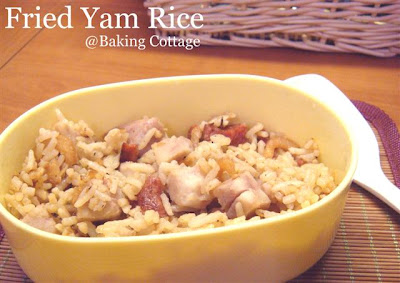
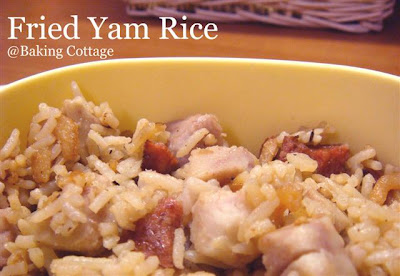
I saved some of the yam for my bento fried rice the next day. As long as you prepare the ingredients in advance, cooking time took less than 20 minutes. The yam rice was very fragrant and I really like the chunky yam. :P

Fried Yam Rice (Serves 2)

Ingredients:

1 tbsp finely chopped garlic
1 tbsp finely chopped onion
1 cup cooked rice
1 tbsp oil
1 1/2 cup chicken stock
1/2 cup cooked yam, cut into large chunks
1 tbsp sesame oil
1 tbsp oyster sauce
35g toasted dried shrimp
55g sliced Chinese sausage
20g dried scallop, pre-soaked in water to soften


For garnishing:

10g coriander leaves
10g toasted sesame seeds
10g sliced red chilli

Method:
  1. Heat oil in a wok, then stir-fry the onion and garlic till fragrant.
  2. Add in the rest of the ingredients one by one, except the rice.
  3. Toss the mixture while stir-frying for 2 to 3 minutes.
  4. Add the rice to the mixture and mix well.
  5. Garnish the fried yam rice and serve immediately.

Recipe Source: Food & Travel - Oct 2008 Issue (Pg 43)

Note: Do add the chicken stock a little at a time. I do not know how much their 1 cup of rice constitutes. 1 1/2 cup stock intially seemed too much for my 1 cup of rice so I only added about 1/2 cup. However, as I was stir-frying the rice, I found that the stock actually absorbed well into the rice (probably because of the yam), hence I added more sesame oil to make it less dry. I also omitted onion, dried scallop, and coriander leaves.


Worth giving this simple one-bowl dish a try!

November 15, 2008

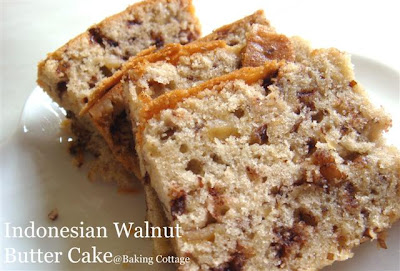
Indonesian Walnut Butter Cake

Despite having taken many shots of this moist walnut butter cake, I just couldn't seem to be able to capture its moist soft texture. Blame it on my poor photography skills, and lack of lighting in my house, heh, so I only have this one best shot here to present.

I made this butter cake at my Company's 'Charity Breakfast Sale'. My mum was lamenting that all that I baked went to the sale and there were only a few pieces and scrapes left for her. So, I baked this again for her and my dd. Using a 7-inch square pan, I was able to cut into three logs, one for dd and 2 for ourselves. Surprisingly out of the many cakes I baked, this butter cake was wiped out in 2 or 3 days! It is no wonder that you can just simply guage how good a food is by how fast it's wiped finish (or not at all). :P


Ingredients:

250g Butter
200g sugar (I reduced to 150g)
4 eggs, separated
200g Plain/cake flour
4g baking powder
30g chocolate chips
150g walnuts
vanilla essence (optional)


Method:
  1. Prepare and line a 9-inch cake pan (I used 7-inch square pan).
  2. Chop walnuts and lightly toast in an oven for about 5 minutes. Be careful not to over toast it.
  3. Sift flour and baking powder. Set aside.

  4. In a large mixing bowl, cream slightly softened butter with half of the sugar (in my case 75g) using an electric beater until light and fluffy.
  5. Add egg yolks, one by one and cream and cream till well mixed.

  6. Add in flour mixture slowly (You may use a wooden spoon manually or if you are using an electric beater, to use low speed). Set aside.
  7. In another mixing bowl, beat egg whites using an electric beater. Add the other half of the sugar slowly and continue beating until the egg white reaches stiff peaks (When you lift the beater, the tip droop slightly, and beaten egg whites becomes stiff and shiny).
  8. Add toasted nuts and chocolate chips into the cake batter.
  9. Fold in beaten egg whites into the cake batter, in two to three additona, until egg whites is well-incorporated into the batter.
  10. Pour batter into prepared pan. Bake in preheated oven at 160C for about 50 minutes to one hour (I used 45 minutes).

This recipe was shared by my sister-in-law who attended a demo class. The steps were tedious but it's worth the effort. It has the richness of a butter cake but the addition of beaten egg whites helps to add lightness to the cake. It's called the combination method as I've read here and here. However, do prepared to do more washing unless you have two beaters. Alternatively like me, I use hand power to do the beating of butter-sugar-eggs-flour. :)

I've been tagged by Yuri and Missy, two wonderful food bloggers to do a meme.

Here are the rules to observe.1. Link to my blog (tagger) on your blog. 2. Give seven facts about yourself. 3. Tag another seven blogs by leaving a comment on their blog and letting them know they were tagged and listing them (and their blogs) on your blog.


  1. I love walking and shopping alot and will not get tired even though people around me already are.

  2. Whenever I visit Daiso, I never leave the place empty handed.

  3. I love to eat bread and sandwiches - alot. :P

  4. I've just started to know how to swim (not entirely but almost) recently. Hehe.

  5. I'm quite a petite girl at 1.56 m (but I'm not skinny though I wish I can just be a little thinner). :P

  6. I'm using a Sony T20 digital camera (white) which I bought a year ago. I bought cos' I decided to have my own blog and chose it cos' of its sleek design. Now, the camera has to acccompany my every baking/cooking session.

  7. My name, Aimei (when translated in chinese) means - love to look pretty. Hehe...since young, people have been teasing me but I'm used to it and I actually quite like my name now. It's a nice and easy name to call and be remembered. :)
Wow...I think the facts are really random! I just jot down whatever comes to me now. I'll try not to tag those who'd already been tagged. So I'm tagging:

Happy Mrs Kwok
Bernice's Baking Journey
OvenHaven
Berenice's Sweets for Treats
Stella's Sweet Temptations
Happy Love Strawberry
Sweet Almond


Have fun!!

November 10, 2008

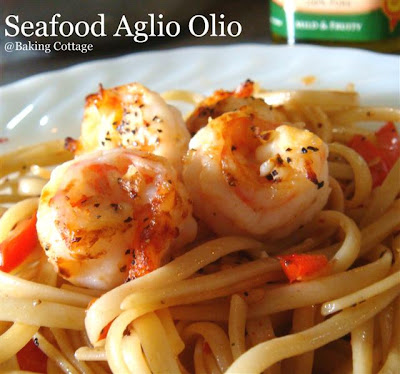
My Favourite Pasta again - Seafood Aglio Olio


When it comes to food, I admit I can be quite boring (choosy). If I like something, especially anything that's healthy, tasty, and I can indulge without much guilt, I can order the same food over and over again. :P

I'd mentioned before that my favourite pasta is Aglio Olio. This is actually not that of a healthy dish if there's lots of oil in it. But I just love it's simplicity (to prepare) and garlic-oil tossed pasta. It is very versatile and you could add anything from chicken, bacon, seafood or grilled veggies. I'd tried different versions from different cafes and they were all so good. I do not know whether cheese is common in this pasta but a sprinkle of grated cheese definitely spices up the flavour! After reading in a chinese food magazine introducing seafood Aglio Olio, I set myself to make it one Saturday.

I have only limited ingredients in my pantry so a simple seafood (prawns) pasta was all I can came up with. This is a simple dish, everyone can do it!

First, prepare all ingredients - Cook the pasta, shell the prawns, diced garlic finely.
Heat wok and fry garlic until fragant. Add prawns and stir-fried for a while.
Remove the prawns. Tranfer prawns to an oven and grill for about 10 minutes for about 180C. (I wanted to achieve the charred-grilled effect)
Add cooked pasta into the garlic mixture and mix evenly. Add salt and pepper to taste.
Add dried chilli flakes and fresh herbs (if you have). I also added some crunchy salad toppings of seeds and nuts.
Serve pasta hot, with grilled prawns.
The above was how I prepared the dish based on estimation. :P Sorry that I did not provide any detailed recipe as I made only small serving of two. The pasta came out to be a little bland though. :P


Once again, I hope to share this with Presto Pasta Night. Coming week's will be hosted by VanieljeKitchen.


November 2, 2008

Easy Shanghai Pancakes


I was in the mood to make myself breakfast yesterday. I browse through my recipe books and decided to make this shanghai pancakes. This is so easy and I have all the ingredients on hand. It doesn't require milk or buttermilk which I'd run out of so this recipe is just perfect!
Shanghai Pancakes
Ingredients:
110g All-purpose flour
1/4 tsp salt
1 egg, beaten
250ml water
2 tbsp white sesame seeds, roasted
Cooking oil
Red Bean Paste/any fillings of your choice
Method:
  1. Sift flour and salt into a deep mixing bowl.
  2. Make a well in the centre, then add beaten egg and half of the water.
  3. With a wooden spoon, gradually work in the flour from all sides.
  4. Pour in remaining water and sesame seeds and mix until batter is smooth. Allow batter to stand for about 30 minutes.
  5. Heat about 2 tsp oil in a small frying pan.
  6. Add about 3 tbsp batter and cook pancakes for 1 minute on each side until both sides are brown. Transfer to a plate.
  7. Repeat until all batter is used up (Add more oil as required).
  8. Spread pancake with bean paste and fold in half. Pan-fry each folded pancake on both sides quickly to make them crisp.
  9. Serve immediately.
Recipe Source: Mini Cookbooks Series - Desserts
This makes about 5 pancakes depending on your thickness. The pancake is plain so when eaten with the red bean paste, it is not overly sweet. I added chunky peanut butter as well. :) Do eat it immediately while it's hot cos' that is when the pancakes are very crispy.